Title 33
SECTION 154.2181
154.2181 Alternative testing program - Test requirements.
§ 154.2181 Alternative testing program - Test requirements.(a) The safety system function test required by 33 CFR 154.2180 must be performed once every two weeks and test for the proper operation and interaction of the analyzer or pressure sensor/switch with shutdown interlocks, and audible and visible alarm devices.
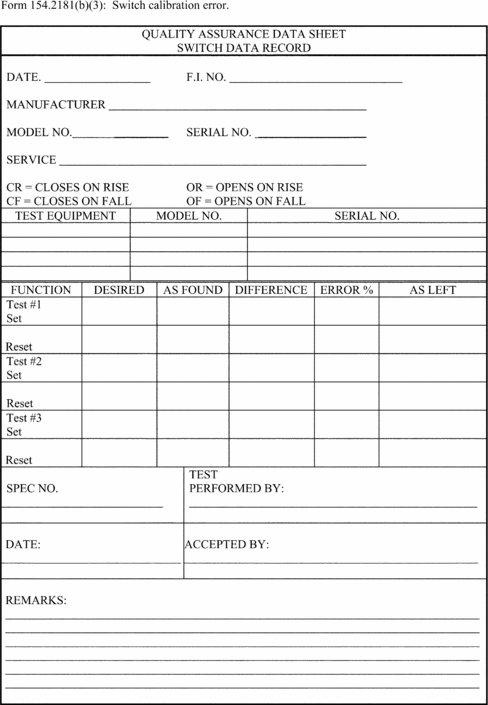
(b) The calibration error (CE) test required by 33 CFR 154.2180 must be performed once every month and documented as shown in Forms 154.2181(b)(2) and 154.2181(b)(3) of this section, to document the accuracy and linearity of the monitoring equipment for the entire measurement range.
(1) The CE test must expose the measurement system, including all monitoring components (e.g., sample lines, filters, scrubbers, conditioners, and as much of the probe as practicable), to the calibration gases, introduced through an injection port located so as to allow a check of the entire measurement system when calibration gases are introduced;
(2) The CE test must check the calibrated range of each analyzer using a lower (zero) and upper (span) reference gas standard. Three measurements must be taken against each standard and recorded as shown in Form 154.2181(b)(2) of this section, with the average of the three values in each case then used to calculate the CE according to this equation (where CE = percentage calibration error based upon span of the instrument, R = reference value of zero or high-level calibration gas introduced into the monitoring system, A = actual monitoring system response to the calibration gas, and S = span of the instrument):
 Form
154.2181(b)(2): Calibration error determination.
| Calibration value | Monitor response |
Difference | ||
|---|---|---|---|---|
| Zero | Span | |||
| 1-Zero | ||||
| 1-Span | ||||
| 2-Zero | ||||
| 2-Span | ||||
| 3-Zero | ||||
| 3-Span | ||||
| Mean Difference = | ||||
| Calibration Error = | % | % | ||
(3) The CE test must check each pressure sensor/switch for upscale (activate) and downscale (deactivate) hysteresis around the sensor/switch set pressure. The calibration error must be calculated and recorded as shown in Form 154.2181(b)(3) of this section. Test the pressure sensor/switch three times and record the desired setting and the as-found set pressure. Calculate and record the difference of the two settings. Calculate the error percentage using this equation (where CE = percentage calibration error based upon span of the instrument, R = reference setting of the instrument, A = actual response as recorded on the test instrument, and S = span of the instrument):
 Record
sensor “as-left” setting only if an adjustment is made.
(c) The calibration drift (CD) test required by 33 CFR 154.2180 must be performed once every quarter and documented as shown in Form 154.2181(c)(3) of this section, to verify the ability of the instrument to conform to the established calibration.
(1) The CD measurement must be conducted once daily for 7 consecutive days without making any adjustments to the instruments.
(2) Conduct the CD test at zero level (between 0 and 20 percent of the instrument span) and at high level (between 75 and 95 percent of the instrument span).
(3) Calculate and record the CD for 7 consecutive days using the equations in paragraphs (b)(2) and (3) of this section and Form 154.2181(c)(3) of this section.
Form 154.2181(c)(3): Calibration drift determination.| Day | Day/time | Reference value (RV) | Monitor value | Difference | Percent of RV |
|---|---|---|---|---|---|
| Low-Level: | |||||
| High-Level: | |||||
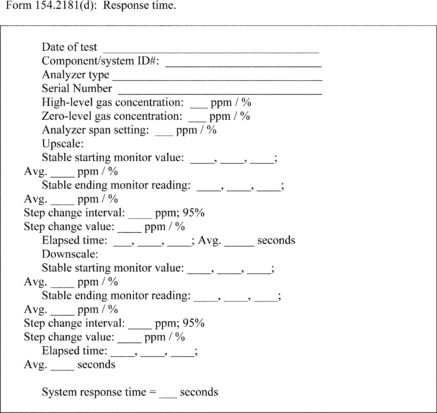
(d) The response time (RT) test required by 33 CFR 154.2180 must be performed once every quarter and documented as shown in Form 154.2181(d) of this section, to determine the RT which is the largest average response time in the upscale or downscale direction.
(1) For systems that normally operate below 20 percent of calibrated range, only a span (upscale) test is required.
(2) Record the span (upscale) value, zero (downscale) cylinder gas value, and stable, initial process-measured variable value.
(3) Determine the step change, which is equal to the average difference between the initial process-measured variable value and the average final stable cylinder gas-measured value.
(4) To determine both upscale and downscale step change intervals -
(i) Inject span (or zero) cylinder gas into the sample system as close to the sample probe as possible. Existing systems that inject the gas at the analyzer box do not need to be modified. However, the gas transit time between the analyzer box and the sample probe must be taken into account;
(ii) Allow the analyzer to stabilize and record the stabilized value. A stable reading is achieved when the concentration reading deviates less than 6 percent from the measured average concentration in 6 minutes or if it deviates less than 2 percent of the monitor's span value in 1 minute;
(iii) Stop the span (or zero) gas flow, allow the monitor to stabilize back to the measured variable value, and record the stabilized value; and
(iv) Repeat this procedure a total of three times and subtract the average final monitor reading from the average starting monitor value to determine the average upscale (or downscale) step change.
(5) Determine the response time, which is equal to the elapsed time at which 95 percent of the step change occurred.
(i) To find this value, take 5 percent of the average step change value and subtract the result from the cylinder gas analyzed value as shown in the following equation:
95% step change value = cylinder gas value − (0.05 × avg. step change)(ii) Inject span (or zero) cylinder gas into the sample system as close to the sample probe as possible, and measure the time it takes to reach the 95 percent step change value.
(iii) Repeat the previous step (paragraph (d)(5)(ii) of this section) a total of three times each with span and zero cylinder gas to determine average upscale and downscale response times.
(iv) Compare the response times achieved for the upscale and downscale tests. The longer of these two times equals the response time for the analyzer.

(e) The sample system bias (SSB) test required by 33 CFR 154.2180 must be performed once every quarter and documented, to establish that the system has no additional influence on the measurement being made by the analyzer.
(1) Conduct a close CE test in accordance with paragraph (b) of this section, by injecting calibration gas as close as possible to the analyzer, eliminating as much of the sample system components as possible, while still simulating the normal source operating conditions.
(2) If system integrity is maintained, and it has not become contaminated, the difference between the close and standard CE tests should be the same.
(f) For CE and CD tests, analyzers and pressure sensors must meet the following minimum compliance requirements:
(1) Oxygen analyzers must not deviate from the reference value of the zero- or high-level calibration gas by more than 0.5 percent of full scale;
(2) Total hydrocarbon analyzers must not deviate from the reference value of the zero- or high-level calibration gas by more than 1 percent of full scale; and
(3) Pressure sensors/switches must not deviate from the reference value of the zero- or high-level calibration gas by more than 1.5 percent of full range.
(g) For RT tests, each oxygen or hydrocarbon analyzer must respond, in less than 1 minute, to 95 percent of the final stable value of a test span gas.
(h) For SSB tests, the analyzer system bias must be less than 5 percent of the average difference between the standard CE test and the close CE test, divided by the individual analyzer span.