Title 40
PART 52 APPENDIX
| Parameter a | Specification |
|---|---|
| 1. Accuracy a | ≤20 percent of reference mean value. |
| 2. Calibration Error a | ≤5 percent of each (50%, and 30%) calibration gas mixture. |
| 3. Zero Drift (2-hours) a | ≤2 percent of emission standard. |
| 4. Zero Drift (24-hours) a | ≤4 percent of emission standard. |
| 5. Calibration Drift (2-hours) a | ≤2 percent of emission standard. |
| 6. Calibration Drift (24-hours) a | ≤5 percent of emission standard. |
| 7. Response Time | ≤5 minutes maximum. |
| 8. Operational Period | ≤168 hours minimum. |
a Expressed as sum of absolute mean value plus 95 percent confidence interval of a series of tests.
5. Performance Specification Test Procedures.
The following test procedures shall be used to determine compliance with the requirements of paragraph 4:
5.1 Calibration test.
5.1.1 Analyze each calibration gas mixture (50 percent, 90 percent) for sulfur dioxide by the Reference method and record the results on the example sheet shown in Figure D-1. This step may be omitted for nonextractive monitors where dynamic calibration gas mixtures are not used (see section 5.1.2).
5.1.2 Set up and calibrate the complete measurement system according to the manufacturer's written instructions. This may be accomplished either in the laboratory or in the field. Make a series of five nonconsecutive readings with span gas mixtures alternately at each concentration (example, 50 percent, 90 percent, 50 percent, 90 percent, 50 percent). For nonextractive measurement systems, this test may be performed using procedures specified by the manufacturer and two or more calibration gases whose concentrations are certified by the manufacturer and differ by a factor of two or more. Convert the measurement system output readings to ppm and record the results on the example sheet shown in Figure D-2.
5.2 Field Test for Accuracy (Relative), Zero Drift and Calibration Drift. Install and operate the measurement system in accordance with the manufacturer's written instructions and drawings as follows:
5.2.1 Conditioning Period. Offset the zero setting at least 10 percent of span so that negative zero drift may be quantified. Operate the system for an initial 168-hour conditioning period. During this period the system should measure the SO2 content of the effluent in a normal operational manner.
5.2.2 Operational Test Period. Operate the system for an additional 168-hour period. The system shall be monitoring the source effluent at all times when not being zeroed, calibrated or backpurged.
5.2.2.1 Field Test for Accuracy (Relative). The analyzer output for the following test shall be maintained between 20 percent and 90 percent of span. It is recommended that a calibrated gas mixture be used to verify the span setting utilized. During this 168-hour test period, make a minimum of nine (9) SO2 concentration measurements using the Reference Method with a sampling period of one hour. If a measurement system operates across the stack or a portion of it, the Reference Method test shall make a four-point traverse over the measurement system operating path. Isokinetic sampling and analysis for SO3 and H2 SO4 mist are not required. For measurement systems employing extractive sampling, place the measurement system and the Reference Method probe tips adjacent to each other in the duct. One test will consist of two simultaneous samples with not less than two analyses on each sample. Record the test data and measurement system concentrations on the example sheet shown in Figure D-3.
5.2.2.2 Field Test for Zero Drift and Calibration Drift. Determine the values given by zero and span gas SO2 concentrations at 2-hour intervals until 15 sets of data are obtained. Alternatively, for nonextractive measurement systems, determine the values given by an electrically or mechanically produced zero condition, and by inserting a certified calibration gas concentration equivalent to not less than 20 percent of span, into the measurement system. Record these readings on the example sheet shown in Figure D-4. These 2-hour periods need not be consecutive but may not overlap. If the analyzer span is set at the expected maximum concentration for the tests performed under section 5.2.2, then the zero and span determinations to be made under this paragraph may be made concurrent with the tests under section 5.2.2.1. Zero and calibration corrections and adjustments are allowed only at 24-hour intervals (except as required under section 5.2.2) or at such shorter intervals as the manufacturer's written instructions specify. Automatic corrections made by the measurement system without operator intervention or initiation are allowable at any time. During the entire 168-hour test period, record the values given by zero and span gas SO2 concentrations before and after adjustment at 24-hour intervals in the example sheet shown in Figure D-5.
5.3 Field Test for Response Time.
5.3.1 This test shall be accomplished using the entire measurement system as installed including sample transport lines if used. Flow rates, line diameters, pumping rates, pressures (do not allow the pressurized calibration gas to change the normal operating pressure in the sample line), etc., shall be at the nominal values for normal operation as specified in the manufacturer's written instructions. In the case of cyclic analyzers, the response time test shall include one cycle.
5.3.2 Introduce a zero concentration of SO2 into the measurement system sampling interface or as close to the sampling interface as possible. When the system output reading has stabilized, switch quickly to a known concentration of SO2 at 70 to 90 percent of span. Record the time from concentration switching to final stable response. After the system response has stabilized at the upper level, switch quickly to a zero concentration of SO2. Record the time from concentration switching to final stable response. Alternatively, for nonextractive monitors, a calibration gas concentration equivalent to 20 percent of span or more may be switched into and out of the sample path and response times recorded. Perform this test sequence three (3) times. For each test record the results on the example sheet shown in Figure D-6.
6. Calculations, Data Analysis and Reporting.
6.1 Procedure for determination of mean values and confidence intervals.
6.1.1 The mean value of a data set is calculated according to equation D-1.
 Where:
xi = individual values. Σ = sum of the individual values.
x = mean value. n = number of data points.
6.1.2 The 95 percent confidence interval (two-sided) is calculated according to equation D-2.
 Where:
Σxi = sum of all data points. t.975 = t1-a/2, and
C.I.95 = 95 percent confidence interval estimated of the average
mean value.
Typical Values for t1−a/2
| n | t.975 | n | t.975 | n | t.975 |
|---|---|---|---|---|---|
| 2 | 12.706 | 7 | 2.447 | 12 | 2.201 |
| 3 | 4.303 | 8 | 2.365 | 13 | 2.179 |
| 4 | 3.182 | 9 | 2.306 | 14 | 2.160 |
| 5 | 2.776 | 10 | 2.262 | 15 | 2.145 |
| 6 | 2.571 | 11 | 2.228 | 16 | 2.131 |
The values in this table are already corrected for n-1 degrees of freedom. Use n equal to the number of samples as data points.
6.2 Data Analysis and Reporting.
6.2.1 Accuracy (Relative). For each of the nine reference method testing periods, determine the average sulfur dioxide concentration reported by the continuous measurement system. These average concentrations shall be determined from the measurement system data recorded under section 5.2.2.1 by integrating the pollutant concentrations over each of the time intervals concurrent with each reference method test, then dividing by the cumulative time of each applicable reference method testing period. Before proceeding to the next step, determine the basis (wet or dry) of the measurement system data and reference method test data concentrations.
If the bases are not consistent, apply a moisture correction to either the referenced method concentrations or the measurement system concentrations, as appropriate. Determine the correction factor by moisture tests concurrent with the reference method testing periods. Report the moisture test method and the correction procedure employed. For each of the nine test runs, subtract the Reference Method test concentrations from the continuous monitoring system average concentrations. Using these data, compute the mean difference and the 95 percent confidence interval using equations D-1 and D-2. Accuracy is reported as the sum of the absolute value of the mean difference and the 95 percent confidence interval expressed as a percentage of the mean reference method value. Use the example sheet shown in Figure D-3.
6.2.2 Calibration Error. Using the data from section 5.1 of this appendix, subtract the measured SO2 value determined under section 5.1.1 (Figure D-1) from the value shown by the measurement system for each of the 5 readings at each concentration measured under section 5.1.2 (Figure D-2). Calculate the mean of these difference values and the 95 percent confidence intervals according to equations D-1 and D-2. The calibration error is reported as the sum of absolute value of the mean difference and the 95 percent confidence interval as a percentage of each respective calibration gas concentration. Use example sheet shown in Figure D-2.
6.2.3 Zero Drift (2-hour). Using the zero concentration values measured each two hours during the field test, calculate the differences between consecutive two-hour readings expressed in ppm. Calculate the mean difference and the confidence interval using Equations D-1 and D-2. Report the zero drift as the sum of the absolute mean value and the confidence interval as a percentage of the emission standard. Use example sheet shown in Figure D-4.
6.2.4 Zero Drift (24-hour). Using the zero concentration values measured every 24 hours during the field test, calculate the differences between the zero point after zero adjustment and the zero value 24 hours later just prior to zero adjustment. Calculate the mean value of these points and the confidence interval using Equations D-1 and D-2. Report the zero drift as the sum of the absolute mean and confidence interval as a percentage of the emission standard. Use example sheet shown in Figure D-5.
6.2.5 Calibration Drift (2-hour). Using the calibration values obtained at two-hour intervals during the field test, calculate the differences between consecutive two-hour readings expressed as ppm. These values should be corrected for the corresponding zero drift during that two-hour period. Calculate the mean and confidence interval of these corrected difference values using Equations D-1 and D-2. Do not use the differences between non-consecutive readings. Report the calibration drift as the sum of the absolute mean and confidence interval as a percentage of the emission standard. Use the example sheet shown in Figure D-4.
6.2.6 Calibration Drift (24-hour). Using the calibration values measured every 24 hours during the field test, calculate the differences between the calibration concentration reading after zero and calibration adjustment and the calibration concentration reading 24 hours later after zero adjustment but before calibration adjustment. Calculate the mean value of these differences and the confidence interval using equations D-1 and D-2. Report the sum of the absolute mean and confidence interval as a percentage of the emission standard. Use the example sheet shown in Figure D-5.
6.2.7 Response Time. Using the charts from section 5.3 of this Appendix, calculate the time interval from concentration switching to 95 percent to the final stable value for all upscale and downscale tests. Report the mean of the three upscale test times and the mean of the three downscale test times. For nonextractive instruments using a calibration gas cell to determine response time, the observed times shall be extrapolated to 90 percent of full scale response time. For example, if the observed time for a 20 percent of span gas cell is one minute, this would be equivalent to a 4 1/2-minute response time when extrapolated to 90 percent of span. The two average times should not differ by more than 15 percent of the slower time. Report the slower time as the system response time. Use the example sheet shown in Figure D-6.
6.2.8 Operational Period. During the 168-hour performance and operational test period, the measurement system shall not require any corrective maintenance, repair, replacement, or adjustment other than that clearly specified as required in the operation and maintenance manuals as routine and expected during a one-week period. If the measurement system operates within the specified performance parameters and does not require corrective maintenance, repair, replacement or adjustment other than specified above, during the 168-hour test period, the operational period will be successfully concluded. Failure of the measurement to meet this requirement shall call for a repetition of the 168-hour test period. Portions of the test which were satisfactorily completed need not be repeated. Failure to meet any performance specifications shall call for a repetition of the one-week performance test period and that portion of the testing which is related to the failed specification. All maintenance and adjustments required shall be recorded. Output readings shall be recorded before and after all adjustments.
6.2.9 Performance Specifications Testing Frequency. In the event that significant repair work is performed in the system, the company shall demonstrate to the Administrator that the system still meets the performance specifications listed in Table I of this appendix. The Administrator may require a performance test at any time he determines that such test is necessary to verify the performance of the measurement system.
7. References.
7.1 Monitoring Instrumentation for the Measurement of Sulfur Dioxide in Stationary Source Emissions, Environmental Protection Agency, Research Triangle Park, N.C., February 1973.
7.2 Instrumentation for the Determination of Nitrogen Oxides Content of Stationary Source Emissions, Environmental Protection Agency, Research Triangle Park, N.C., APTD 0847, Vol. I, October 1971; APTD 0942, Vol. II, January 1972.
7.3 Experimental Statistics, Department of Commerce, Handbook 91, 1963, p. 3-31, paragraphs 3-3.1.4.
7.4 Performance Specifications for Stationary-Source Monitoring Systems for Gases, and Visible Emissions, Environmental Protection Agency, Research Triangle Park, N.C., EPA-650/2-74-013, January 1974.
Figure D-1 - Analysis of Calibration Gas Mixtures
Date _____ Reference Method Used _____
| Mid Range Calibration Gas Mixture | |
| Sample 1 | ppm |
| Sample 2 | ppm |
| Sample 3 | ppm |
| Average | ppm |
| High Range (span) Calibration Gas Mixture | |
| Sample 1 | ppm |
| Sample 2 | ppm |
| Sample 3 | ppm |
| Average | ppm |
Figure D-2 - Calibration Error Determination
Calibration gas mixture data (from fig. D-1): Mid (50 percent) average __ p/m, high (90 percent) average __ p/m
| Run No. | Calibration gas concentration 1 | Measurement system reading, p/m | Differences, p/m 2 |
|---|---|---|---|
| 1 | |||
| 2 | |||
| 3 | |||
| 4 | |||
| 5 | |||
| 6 | |||
| 7 | |||
| 8 | |||
| 9 | |||
| 1 | |||
| 11 | |||
| 12 | |||
| 13 | |||
| 14 | |||
| 15 |
| Percent of full scale reading | ||
|---|---|---|
| 50% mid | 90% high | |
| Mean difference | ||
| Confidence interval | ±.............. | ±.............. |
| Calibration error = Mean difference 3 + C.I. / Average calibration gas concentration × 100 | %.............. | %.............. |
1 Mid or high.
2 Calibration gas concentration - measurement system reading.
3 Absolute value.
Figure D-3 - Accuracy
| Date and time | Test No. | Reference method samples | Analyzer 1-hour average 1 (p/m) | Difference 2 (p/m) |
|---|---|---|---|---|
| 1 | ||||
| 2 | ||||
| 3 | ||||
| 4 | ||||
| 5 | ||||
| 6 | ||||
| 7 | ||||
| 8 | ||||
| 9 | ||||
| Mean difference= _____p/m. | ||||
| 95 percent confidence interval= + _____p/m. | ||||
| Mean Reference method value= _____p/m. | ||||
| Accuracy = Mean difference (absolute value) + 95 percent confidence interval/Mean reference method value × 100___percent | ||||
1 Explain method used to determine average.
2 Difference = the 1-h average minus the reference method average.
Figure D-4 - Zero and Calibration Drift (2 h)
| Date | Time | Date set No. | Zero reading | Zero drift (Δ zero) | Span reading | (Δ span) | Calibration drift (Δ span-Δ zero) | |
|---|---|---|---|---|---|---|---|---|
| Begin | End | |||||||
| 1 | ||||||||
| 2 | ||||||||
| 3 | ||||||||
| 4 | ||||||||
| 5 | ||||||||
| 6 | ||||||||
| 7 | ||||||||
| 8 | ||||||||
| 9 | ||||||||
| 10 | ||||||||
| 11 | ||||||||
| 12 | ||||||||
| 13 | ||||||||
| 14 | ||||||||
| 15 | ||||||||
| Zero drift=[mean zero drift 1___ + CI (zero) ___ ÷ emission standard] × 100= ___. | ||||||||
| Calibration drift=[mean span drift 1 ___ CI + CI (span) ___ ÷ emission standard] × 100= ___. | ||||||||
1 Absolute value.
Figure D-5 - Zero and Calibration Drift (24 hr)
| Date and time | Zero reading | Zero drift (Δ zero) | Span reading (after zero adjustment) | Calibration drift (Δ span) |
|---|---|---|---|---|
| Zero drift=[mean zero drift 1___ + CI (zero) ___ ÷ emission standard] × 100= ___. | ||||
| Calibration drift=[mean span drift 1___ + CI (span) ___ ÷ emission standard] × 100= ___. | ||||
1 Absolute value.
1 ____ seconds.
2 ____ seconds.
3 ____ seconds.
Average upscale response ____ seconds. Downscale:1 ____ seconds.
2 ____ seconds.
3 ____ seconds.
Average downscale response ____ seconds. System response time = slower time __ seconds. Percent deviation from slowest time = average upscale − average downscale × 100% / slower time [40 FR 5517, Feb. 6, 1975]Appendix E to Part 52 - Performance Specifications and, Specification Test Procedures for Monitoring Systems for Effluent Stream Gas Volumetric Flow Rate
40:5.0.1.1.1.19.1.6.3 : Appendix E
Appendix E to Part 52 - Performance Specifications and, Specification Test Procedures for Monitoring Systems for Effluent Stream Gas Volumetric Flow Rate1. Principle and applicability.
1.1 Principle. Effluent stream gas volumetric flow rates are sampled and analyzed by a continuous measurement system. To verify the measurement system performance, values obtained from the measurement system are compared against simultaneous values obtained using the reference method. These comparison tests will be performed to determine the relative accuracy, and drift of the measurement system over the range of operating conditions expected to occur during normal operation of the source. If the measurement system is such that the specified tests in section 5.1 for drift do not apply, those test procedures shall be disregarded.
1.2 Applicability. This method is applicable to subparts which require continuous gas volumetric flow rate measurement. Specifications are given in terms of performance. Test procedures are given for determining compliance with performance specifications.
2. Apparatus.
2.1 Continuous measurement system for determining stack gas volumetric flow rate.
2.2 Equipment for measurement of stack gas volumetric flow rate as specified in the reference method.
3. Definitions.
3.1 Measurement system. The total equipment required for the determination of the gas volumetric flow rate in a duct or stack. The system consists of three major subsystems:
3.1.1 Sampling interface. That portion of the measurement system that performs one or more of the following operations: Delineation, acquisition, transportation, and conditioning of a signal from the stack gas and protection of the analyzer from any hostile aspects of the source environment.
3.1.2 Analyzer. That portion of the measurement system which senses the stack gas flow rate or velocity pressure and generates a signal output that is a function of the flow rate or velocity of the gases.
3.1.3 Data presentation. That portion of the measurement system that provides a display of the output signal in terms of volumetric flow rate units, or other units which are convertible to volumetric flow rate units.
3.2 Span. The value of gas volumetric flow rate at which the measurement system is set to produce the maximum data display output. For the purposes of this method, the span shall be set at 1.5 times the maximum volumetric flow rate expected under varying operating conditions of the source.
3.3 Zero drift. The change in measurement system output over a stated period of time of normal continuous operation when gas volumetric flow rate at the time of the measurements is zero.
3.4 Calibration drift. The change in measurement system output over a stated time period of normal continuous operation when the gas volumetric flow rate at the time of the measurement is 67 percent of the span value.
3.5 Operation period. A minimum period of time over which a measurement system is expected to operate within certain performance specifications without unscheduled maintenance, repair, or adjustment.
3.6 Orientation sensitivity. The angular tolerance to which the sensor can be misaligned from its correct orientation to measure the flow rate vector before a specified error occurs in the indicated flow rate compared to the reference flow rate.
3.7 Reference method. Method 2 as delineated in 40 CFR Part 60.
4. Measurement system performance specifications. A measurement system must meet the performance specifications in Table E-1 to be considered acceptable under this method.
Table E-1
| Parameter | Specifications |
|---|---|
| Accuracy (relative) | <10 percent of mean reference value (paragraph 6.3.1). |
| Zero drift (24 hours) | <3 percent of span (paragraph 6.3.2). |
| Calibration drift (24 hours) | <3 percent of span (paragraph 6.3.3). |
| Operational period | <168 hours minimum. |
5. Test procedures.
5.1 Field test for accuracy, zero drift, calibration drift, and operation period.
5.1.1 System conditioning. Set up and operate the measurement system in accordance with the manufacturer's written instructions and drawings. Offset the zero point of the chart recorder so that negative values up to 5 percent of the span value may be registered. Operate the system for an initial 168-hour conditioning period. During this initial period, the system should measure the gas stream volumetric flow rate in a normal operational manner. After completion of this conditioning period, the formal 168-hour performance and operational test period shall begin.
5.1.2 Field test for accuracy and operational period. During the 168-hour test period, the system should be continuously measuring gas volumetric flow rate at all times. During this period make a series of 14 volumetric flow rate determinations simultaneously using the reference method and the measurement system. The 14 determinations can be made at any time interval at least one hour apart during the 168-hour period except that at least one determination on five different days must be made with one determination on the last day of such period. The determinations shall be conducted over the range of volumetric flow rates expected to occur during normal operation of the source. The measurement system volumetric flow rate reading corresponding to the period of time during which each reference method run was made may be obtained by continuous integration of the measurement system signal over the test interval. Integration may be by use of mechanical integration of electrical units on the chart recorder or use of a planimeter on the strip chart recorder. The location and orientation of the reference method measurement device and the measurement system should be as close as practical without interference, but no closer than 1.3 cm (0.5 inch) to each other and shall be such that dilution air or other interferences cannot be interjected into the stack or duct between the pitot tube and the measurement system. Be careful not to locate the reference method pitot tube directly up or down stream of the measurement system sensor.
5.1.3 Field test for calibration drift and zero drift. At 24-hour intervals, but more frequently if recommended by the manufacturer, subject the measurement system to the manufacturer's specified zero and calibration procedures, if appropriate. Record the measurement system output readings before and after adjustment. Automatic corrections made by the system without operator intervention are allowable at anytime.
5.1.4 Field test for orientation sensitivity. If a velocity measurement system is either a single point measurement device or a pressure sensor or any other device such as pitot tube which uses the flow direction of the test gas, then the following test shall be followed and a performance specification of ±10 degrees device orientation sensitivity for ±4 percent flow rate determination accuracy must be met in order for the measurement system to be considered acceptable under this method. This is in addition to the performance specifications given in paragraph 4 of this appendix. During a period of relatively steady state gas flow, perform the following orientation test using the measurement system. The system should be continuously measuring gas velocity at all times. Rotate the measurement 10° on each side of the direction of flow in increments of 5°. Perform this test three times each at:
(1) Maximum operating velocity (±15 percent);
(2) 67 percent ±7.5 percent of the maximum operating velocity; and
(3) 33 percent ±7.5 percent of the maximum operating velocity if (2) and (3) are normal operating practices.
6. Calculations data analysis and reporting.
6.1 Procedure for determination of stack gas volumetric flow rate. Calculate the reference stack gas velocity and corresponding stack gas volumetric flow rate with the calibrated type S pitot tube measurements by the reference method. Calculate the measurement system stack gas volumetric flow rate as specified by the manufacturer's written instructions. Record the volumetric flow rates for each in the appropriate tables.
6.2 Procedure for determination of mean values and 95 percent confidence intervals.
6.2.1 Mean value. The mean value of a data set is calculated according to Equation E-1.
Equation E-1 Where: xi = individual values. Σ = sum of the individual values. x = mean value. n = data points.6.2.2 95 percent confidence level. The 95 percent confidence level (two sided) is calculated according to Equation E-2.
Equation E-2 Where: Σxi = sum of all data points. (Σxi) = sum of squares of all data points. C.I.95 = 95 percent confidence interval estimate of the average mean value.Values for t.975
| n | t.975 | n | t.975 | n | t.975 |
|---|---|---|---|---|---|
| 2 | 12.706 | 7 | 2.447 | 12 | 2.201 |
| 3 | 4.303 | 8 | 2.365 | 13 | 2.179 |
| 4 | 3.182 | 9 | 2.306 | 14 | 2.160 |
| 5 | 2.776 | 10 | 2.262 | 15 | 2.145 |
| 6 | 2.571 | 11 | 2.228 | 16 | 2.131 |
6.3 Data analysis and reporting.
6.3.1 Accuracy (relative). First, calculate the mean reference value (Equation E-1) of the 14 average volumetric flow rates calculated by the reference method. Second, from the 14 pairs of average volumetric flow rates calculated by the reference method and measurement system volumetric flow rate readings, calculate the mean value (Equation E-1) of the differences of the 14 paired readings. Calculate the 95 percent confidence interval (Equation E-2) using the differences of fourteen paired readings. To calculate the values in the second part of this section substitute di for xi and d for x in Equations E-1 and E-2 where di equals the difference of each paired reading and d equals the mean value of the fourteen paired differences. Third, report the sum of the absolute mean value of the differences of the fourteen paired readings and the 95 percent confidence interval of the differences of value calculated in the first part of the section. Divide this total by the mean reference value and report the result as a percentage. This percentage is the relative accuracy.
6.3.2 Zero drift (24 hour). From the zero values measured each 24 hours during the field test, calculate the differences between successive readings expressed in volumetric flow rate units. Calculate the mean value of these differences and the confidence interval of these differences using Equations E-1 and E-2. Report the sum of the absolute value of the mean difference and the confidence interval as a percentage of the measurement system span. This percentage is the zero drift.
6.3.3 Calibration drift (24 hour). From the calibration values measured every 24 hours during the field test calculate the differences between: (1) The calibration reading after zero and calibration adjustment, and (2) the calibration reading 24 hours later after zero adjustment but before calibration adjustment. Calculate the mean value of these differences and the confidence interval using Equations E-1 and E-2. Report the sum of the absolute value of the mean difference and confidence interval as a percentage of the measurement system span. This percentage is the calibration drift.
6.3.4 Operation period. Other than that clearly specified as required in the operation and maintenance manual, the measurement system shall not require any corrective maintenance, repair, replacement or adjustment during the 168-hour performance and operational test period. If the measurement system operates within the specified performance parameters and does not require corrective maintenance, repair, replacement or adjustment other than as specified above during the 168-hour test period, the operational period will be successfully concluded. Failure of the measurement to meet this requirement shall call for a repetition of the 168-hour test period. Portions of the test, except for the 168-hour field test period, which were satisfactorily completed need not be repeated. Failure to meet any performance specifications shall call for a repetition of the one-week performance test period and that portion of the testing which is related to the failed specification. All maintenance and adjustments required shall be recorded. Output readings shall be recorded before and after all adjustments.
6.3.5 Orientation sensitivity. In the event the conditions of paragraph 5.1.4 of this appendix are required, the following calculations shall be performed. Calculate the ratio of each measurement system reading divided by the reference pitot tube readings. Graph the ratio vs. angle of deflection on each side of center. Report the points at which the ratio differs by more than ±4 percent from unity (1.00).
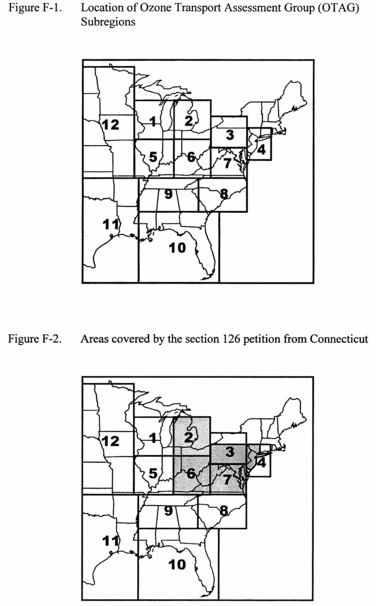
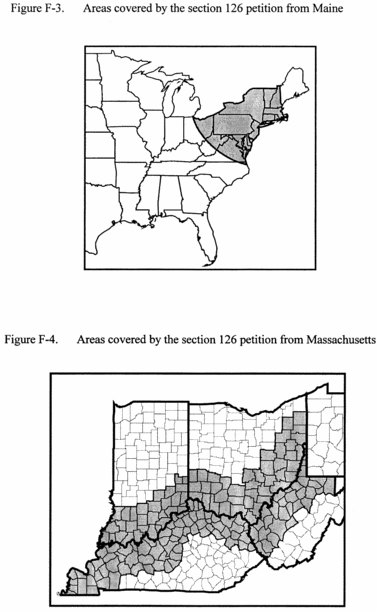
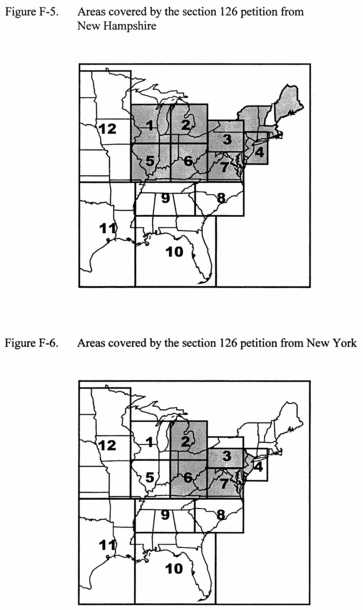
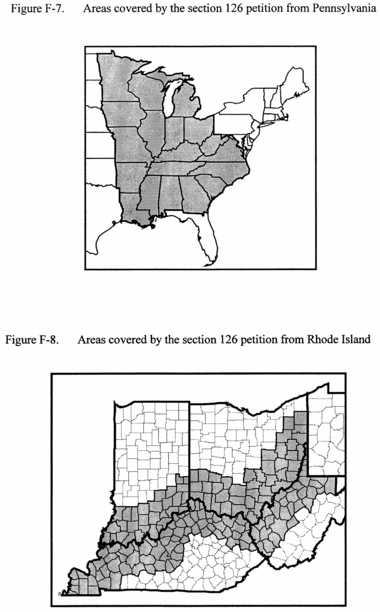
Appendix F to Part 52 - Clean Air Act Section 126 Petitions From Eight Northeastern States: Named Source Categories and Geographic Coverage
40:5.0.1.1.1.20.1.6.4 : Appendix F
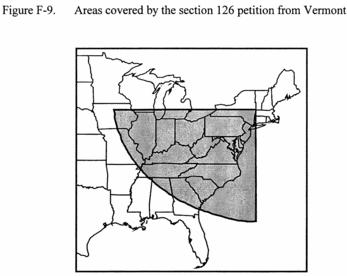
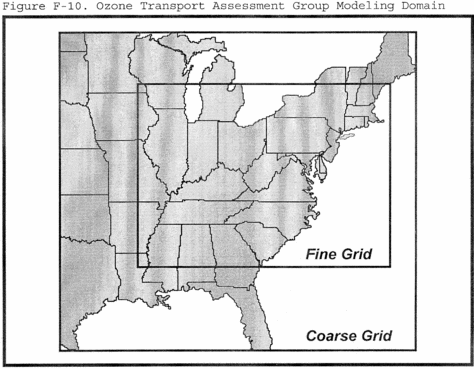
Appendix F to Part 52 - Clean Air Act Section 126 Petitions From Eight Northeastern States: Named Source Categories and Geographic CoverageThe table and figures in this appendix are cross-referenced in § 52.34.
Table F-1 - Named Source Categories in Section 126 Petitions
| Petitioning state | Named source categories |
|---|---|
| Connecticut | Fossil fuel-fired boilers or other indirect heat exchangers with a maximum gross heat input rate of 250 mmBtu/hr or greater and electric utility generating facilities with a rated output of 15 MW or greater. |
| Maine | Electric utilities and steam-generating units with a heat input capacity of 250 mmBtu/hr or greater. |
| Massachusetts | Electricity generating plants. |
| New Hampshire | Fossil fuel-fired indirect heat exchange combustion units and fossil fuel-fired electric generating facilities which emit ten tons of NOX or more per day. |
| New York | Fossil fuel-fired boilers or indirect heat exchangers with a maximum heat input rate of 250 mmBtu/hr or greater and electric utility generating facilities with a rated output of 15 MW or greater. |
| Pennsylvania | Fossil fuel-fired indirect heat exchange combustion units with a maximum rated heat input capacity of 250 mmBtu/hr or greater, and fossil fuel-fired electric generating facilities rated at 15 MW or greater. |
| Rhode Island | Electricity generating plants. |
| Vermont | Fossil fuel-fired electric utility generating facilities with a maximum gross heat input rate of 250 mmBtu/hr or greater and potentially other unidentified major sources. |
 [64 FR 28323, May
25, 1999, as amended at 69 FR 31505, June 3, 2004]