Title 29
SECTION 1910.215
1910.215 Abrasive wheel machinery.
§ 1910.215 Abrasive wheel machinery.(a) General requirements - (1) Machine guarding. Abrasive wheels shall be used only on machines provided with safety guards as defined in the following paragraphs of this section, except:
(i) Wheels used for internal work while within the work being ground;
(ii) Mounted wheels, used in portable operations, 2 inches and smaller in diameter; and
(iii) Types 16, 17, 18, 18R, and 19 cones, plugs, and threaded hole pot balls where the work offers protection.
(2) Guard design. The safety guard shall cover the spindle end, nut, and flange projections. The safety guard shall be mounted so as to maintain proper alignment with the wheel, and the strength of the fastenings shall exceed the strength of the guard, except:
(i) Safety guards on all operations where the work provides a suitable measure of protection to the operator, may be so constructed that the spindle end, nut, and outer flange are exposed; and where the nature of the work is such as to entirely cover the side of the wheel, the side covers of the guard may be omitted; and
(ii) The spindle end, nut, and outer flange may be exposed on machines designed as portable saws.
(3) Flanges. Grinding machines shall be equipped with flanges in accordance with paragraph (c) of this section.
(4) Work rests. On offhand grinding machines, work rests shall be used to support the work. They shall be of rigid construction and designed to be adjustable to compensate for wheel wear. Work rests shall be kept adjusted closely to the wheel with a maximum opening of one-eighth inch to prevent the work from being jammed between the wheel and the rest, which may cause wheel breakage. The work rest shall be securely clamped after each adjustment. The adjustment shall not be made with the wheel in motion.
(5) Excluded machinery. Natural sandstone wheels and metal, wooden, cloth, or paper discs, having a layer of abrasive on the surface are not covered by this section.
(b) Guarding of abrasive wheel machinery - (1) Cup wheels. Cup wheels (Types 6 and 11) shall be protected by:
(i) Safety guards as specified in paragraphs (b) (1) through (10) of this section;
(ii) Band type guards as specified in paragraph (b)(11) of this section; and
(iii) Special “Revolving Cup Guards” which mount behind the wheel and turn with it. They shall be made of steel or other material with adequate strength and shall enclose the wheel sides upward from the back for one-third of the wheel thickness. The mounting features shall conform with all requirements of this section. It is necessary to maintain clearance between the wheel side and the guard. This clearance shall not exceed one-sixteenth inch.
(2) Guard exposure angles. The maximum exposure angles specified in paragraphs (b) (3) through (8) of this section shall not be exceeded. Visors or other accessory equipment shall not be included as a part of the guard when measuring the guard opening, unless such equipment has strength equal to that of the guard.
(3) Bench and floor stands. The angular exposure of the grinding wheel periphery and sides for safety guards used on machines known as bench and floor stands should not exceed 90° or one-fourth of the periphery. This exposure shall begin at a point not more than 65° above the horizontal plane of the wheel spindle. (See Figures O-6 and O-7 and paragraph (b)(9) of this section.)
 Figure
No. O-6 Figure No. O-7 Wherever the nature of the work requires
contact with the wheel below the horizontal plane of the spindle,
the exposure shall not exceed 125°. (See Figures O-8 and O-9.)
 Figure
No. O-8 Figure No. O-9
(4) Cylindrical grinders. The maximum angular exposure of the grinding wheel periphery and sides for safety guards used on cylindrical grinding machines shall not exceed 180°. This exposure shall begin at a point not more than 65° above the horizontal plane of the wheel spindle. (See Figures O-10 and O-11 and subparagraph (9) of this paragraph.)
 Figure
No. O-10 Figure No. O-11
(5) Surface grinders and cutting-off machines. The maximum angular exposure of the grinding wheel periphery and sides for safety guards used on cutting-off machines and on surface grinding machines which employ the wheel periphery shall not exceed 150°. This exposure shall begin at a point not less than 15° below the horizontal plane of the wheel spindle. (See Figures O-12 and O-13)
 Figure
No. O-12 Figure No. O-13
(6) Swing frame grinders. The maximum angular exposure of the grinding wheel periphery and sides for safety guards used on machines known as swing frame grinding machines shall not exceed 180°, and the top half of the wheel shall be enclosed at all times. (See Figures O-14 and O-15.)
 Figure
No. O-14 Figure No. O-15
(7) Automatic snagging machines. The maximum angular exposure of the grinding wheel periphery and sides for safety guards used on grinders known as automatic snagging machines shall not exceed 180° and the top half of the wheel shall be enclosed at all times. (See Figures O-14 and O-15.)
(8) Top grinding. Where the work is applied to the wheel above the horizontal centerline, the exposure of the grinding wheel periphery shall be as small as possible and shall not exceed 60°. (See Figures O-16 and O-17.)
 Figure
No. O-16 Figure No. O-17
(9) Exposure adjustment. Safety guards of the types described in subparagraphs (3) and (4) of this paragraph, where the operator stands in front of the opening, shall be constructed so that the peripheral protecting member can be adjusted to the constantly decreasing diameter of the wheel. The maximum angular exposure above the horizontal plane of the wheel spindle as specified in paragraphs (b) (3) and (4) of this section shall never be exceeded, and the distance between the wheel periphery and the adjustable tongue or the end of the peripheral member at the top shall never exceed one-fourth inch. (See Figures O-18, O-19, O-20, O-21, O-22, and O-23.)
(10) Material requirements and minimum dimensions. (i) See Figures O-36 and O-37 and Table O-9 for minimum basic thickness of peripheral and side members for various types of safety guards and classes of service.
(ii) If operating speed does not exceed 8,000 surface feet per minute cast iron safety guards, malleable iron guards or other guards as described in paragraph (b)(10)(iii) of this section shall be used.
(iii) Cast steel, or structural steel, safety guards as specified in Figures O-36 and O-37 and Table O-9 shall be used where operating speeds of wheels are faster than 8,000 surface feet per minute up to a maximum of 16,000 surface feet per minute.
(iv) For cutting-off wheels 16 inches diameter and smaller and where speed does not exceed 16,000 surface feet per minute, cast iron or malleable iron safety guards as specified in Figures O-36 and O-37, and in Table O-9 shall be used.
 Figure
No. O-18 Figure No. O-19 correct Showing adjustable tongue
giving required angular protection for all sizes of wheel used.
 Figure
No. O-20 Figure No. O-21 correct Showing movable guard with
opening small enough to give required protection for smallest size
wheel used.
  Figure No. O-22
Figure No. O-23 incorrect Showing movable guard with size of
opening correct for full size wheel but too large for smaller
wheels.
(v) For cutting-off wheels larger than 16 inches diameter and where speed does not exceed 14,200 surface feet per minute, safety guards as specified in Figures O-27 and O-28, and in Table O-1 shall be used.
(vi) For thread grinding wheels not exceeding 1 inch in thickness cast iron or malleable iron safety guards as specified in Figures O-36 and O-37, and in Table O-9 shall be used.
(11) Band type guards - general specifications. Band type guards shall conform to the following general specifications:
(i) The bands shall be of steel plate or other material of equal or greater strength. They shall be continuous, the ends being either riveted, bolted, or welded together in such a manner as to leave the inside free from projections.
(ii) The inside diameter of the band shall not be more than 1 inch larger than the outside diameter of the wheel, and shall be mounted as nearly concentric with the wheel as practicable.
(iii) The band shall be of sufficient width and its position kept so adjusted that at no time will the wheel protrude beyond the edge of the band a distance greater than that indicated in Figure O-29 and in Table O-2 or the wall thickness (W), whichever is smaller.
(12) Guard design specifications. Abrasive wheel machinery guards shall meet the design specifications of the American National Standard Safety Code for the Use, Care, and Protection of Abrasive Wheels, ANSI B7.1-1970, which is incorporated by reference as specified in § 1910.6. This requirement shall not apply to natural sandstone wheels or metal, wooden, cloth, or paper discs, having a layer of abrasive on the surface.
(c) Flanges - (1) General requirements. All abrasive wheels shall be mounted between flanges which shall not be less than one-third the diameter of the wheel.
(i) Exceptions:
(a) Mounted wheels.
(b) Portable wheels with threaded inserts or projecting studs.
(c) Abrasive discs (inserted nut, inserted washer and projecting stud type).
(d) Plate mounted wheels.
(e) Cylinders, cup, or segmental wheels that are mounted in chucks.
(f) Types 27 and 28 wheels.
(g) Certain internal wheels.
(h) Modified types 6 and 11 wheels (terrazzo).
(i) Cutting-off wheels, Types 1 and 27A (see paragraphs (c)(1) (ii) and (iii) of this section).
(ii) Type 1 cutting-off wheels are to be mounted between properly relieved flanges which have matching bearing surfaces. Such flanges shall be at least one-fourth the wheel diameter.
(iii) Type 27A cutting-off wheels are designed to be mounted by means of flat, not relieved, flanges having matching bearing surfaces and which may be less than one-third but shall not be less than one-fourth the wheel diameter. (See Figure O-24 for one such type of mounting.)
(iv) There are three general types of flanges:
(a) Straight relieved flanges (see Figure O-32);
(b) Straight unrelieved flanges (see Figure O-30);
(c) Adaptor flanges (see Figures O-33 and O-34);
(v) Regardless of flange type used, the wheel shall always be guarded. Blotters shall be used in accordance with paragraph (c)(6) of this section.
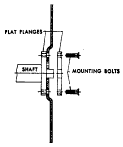 Figure
No. O-24 The Type 27 A Wheel is mounted between flat
non-relieved flanges of equal bearing surfaces.
(2) [Reserved]
(3) Finish and balance. Flanges shall be dimensionally accurate and in good balance. There shall be no rough surfaces or sharp edges.
(4) Uniformity of diameter. (i) Both flanges, of any type, between which a wheel is mounted, shall be of the same diameter and have equal bearing surface. Exceptions are set forth in the remaining subdivisions of this subparagraph.
(ii) Type 27 and Type 28 wheels, because of their shape and usage, require specially designed adaptors. The back flange shall extend beyond the central hub or raised portion and contact the wheel to counteract the side pressure on the wheel in use. The adaptor nut which is less than the minimum one-third diameter of wheel fits in the depressed side of wheel to prevent interference in side grinding and serves to drive the wheel by its clamping force against the depressed portion of the back flange. The variance in flange diameters, the adaptor nut being less than one-third wheel diameter, and the use of side pressure in wheel operation limits the use to reinforced organic bonded wheels. Mounts which are affixed to the wheel by the manufacturer shall not be reused. Type 27 and Type 28 wheels shall be used only with a safety guard located between wheel and operator during use. (See Figure O-24-A.)
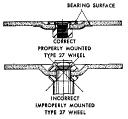 Figure
No. O-24-A Types 27 and 28 wheels, because of their shape,
require specially designed adaptors.
(iii) Modified Types 6 and 11 wheels (terrazzo) with tapered K dimension.
(5) Recess and undercut. (i) Straight relieved flanges made according to Table O-6 and Figure O-32 shall be recessed at least one-sixteenth inch on the side next to the wheel for a distance as specified in Table O-6.
(ii) Straight flanges of the adaptor or sleeve type (Table O-7 and Figures O-33 and O-34) shall be undercut so that there will be no bearing on the sides of the wheel within one-eighth inch of the arbor hole.
(6) Blotters. (i) Blotters (compressible washers) shall always be used between flanges and abrasive wheel surfaces to insure uniform distribution of flange pressure. (See paragraph (d)(5) of this section.)
(ii) Exception:
(a) Mounted wheels.
(b) Abrasive discs (inserted nut, inserted washer, and projecting stud type).
(c) Plate mounted wheels.
(d) Cylinders, cups, or segmental wheels that are mounted in chucks.
(e) Types 27 and 28 wheels.
(f) Certain Type 1 and Type 27A cutting-off wheels.
(g) Certain internal wheels.
(h) Type 4 tapered wheels.
(i) Diamond wheels, except certain vitrified diamond wheels.
(j) Modified Types 6 and 11 wheel (terrazzo) - blotters applied flat side of wheel only.
(7) Driving flange. The driving flange shall be securely fastened to the spindle and the bearing surface shall run true. When more than one wheel is mounted between a single set of flanges, wheels may be cemented together or separated by specially designed spacers. Spacers shall be equal in diameter to the mounting flanges and have equal bearing surfaces. (See paragraph (d)(6) of this section.)
(8) Dimensions. (i) Tables O-4 and O-6 and Figures O-30 and O-32 show minimum dimensions for straight relieved and unrelieved flanges for use with wheels with small holes that fit directly on the machine spindle. Dimensions of such flanges shall never be less than indicated.
(ii) Table O-5, and Table O-7 and Figures O-31, O-33, O-34 show minimum dimensions for straight adaptor flanges for use with wheels having holes larger than the spindle. Dimensions of such adaptor flanges shall never be less than indicated.
(iii) Table O-8 and Figure O-35 show minimum dimensions for straight flanges that are an integral part of wheel sleeves which are frequently used on precision grinding machines. Dimensions of such flanges shall never be less than indicated.
(9) Repairs and maintenance. All flanges shall be maintained in good condition. When the bearing surfaces become worn, warped, sprung, or damaged they should be trued or refaced. When refacing or truing, care shall be exercised to make sure that proper relief and rigidity is maintained as specified in paragraphs (c) (2) and (5) of this section and they shall be replaced when they do not conform to these subparagraphs and Table O-4, Figure O-30, Table O-5, Figure O-31, Table O-6, Figure O-32, and Table O-8, Figure O-35. Failure to observe these rules might cause excessive flange pressure around the hole of the wheel. This is especially true of wheel-sleeve or adaptor flanges.
(d) Mounting - (1) Inspection. Immediately before mounting, all wheels shall be closely inspected and sounded by the user (ring test) to make sure they have not been damaged in transit, storage, or otherwise. The spindle speed of the machine shall be checked before mounting of the wheel to be certain that it does not exceed the maximum operating speed marked on the wheel. Wheels should be tapped gently with a light nonmetallic implement, such as the handle of a screwdriver for light wheels, or a wooden mallet for heavier wheels. If they sound cracked (dead), they shall not be used. This is known as the “Ring Test”.
(i) Wheels must be dry and free from sawdust when applying the ring test, otherwise the sound will be deadened. It should also be noted that organic bonded wheels do not emit the same clear metallic ring as do vitrified and silicate wheels.
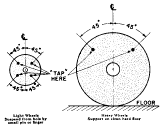 Figure
No. O-25 Figure No. O-26
(ii) “Tap” wheels about 45° each side of the vertical centerline and about 1 or 2 inches from the periphery as indicated by the spots in Figure O-25 and Figure O-26. Then rotate the wheel 45° and repeat the test. A sound and undamaged wheel will give a clear metallic tone. If cracked, there will be a dead sound and not a clear “ring.”
(2) Arbor size. Grinding wheels shall fit freely on the spindle and remain free under all grinding conditions. A controlled clearance between the wheel hole and the machine spindle (or wheel sleeves or adaptors) is essential to avoid excessive pressure from mounting and spindle expansion. To accomplish this, the machine spindle shall be made to nominal (standard) size plus zero minus .002 inch, and the wheel hole shall be made suitably oversize to assure safety clearance under the conditions of operating heat and pressure.
(3) Surface condition. All contact surfaces of wheels, blotters and flanges shall be flat and free of foreign matter.
(4) Bushing. When a bushing is used in the wheel hole it shall not exceed the width of the wheel and shall not contact the flanges.
(5) Blotters. When blotters or flange facings of compressible material are required, they shall cover entire contact area of wheel flanges. Blotters need not be used with the following types of wheels:
(i) Mounted wheels.
(ii) Abrasive discs (inserted nut, inserted washer, and projecting-stud type).
(iii) Plate mounted wheels.
(iv) Cylinders, cups, or segmental wheels that are mounted in chucks.
(v) Types 27 and 28 wheels.
(vi) Certain Type 1 and Type 27A cutting-off wheels.
(vii) Certain internal wheels.
(viii) Type 4 tapered wheels.
(ix) Diamond wheels, except certain vitrified diamond wheels.
(6) Multiple wheel mounting. When more than one wheel is mounted between a single set of flanges, wheels may be cemented together or separated by specially designed spacers. Spacers shall be equal in diameter to the mounting flanges and have equal bearing surfaces. When mounting wheels which have not been cemented together, or ones which do not utilize separating spacers, care must be exercised to use wheels specially manufactured for that purpose.
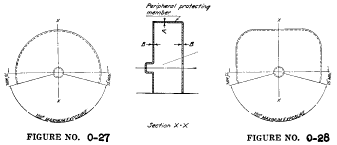
Table O-1 - Minimum Basic Thickness for Peripheral and Side Members for Safety Guards Used With Cutting-Off Wheels
| Material used in construction of guard | Maximum thickness of cutting off wheel | Speed not to exceed | Cutting off wheel diameters | |||||||||
|---|---|---|---|---|---|---|---|---|---|---|---|---|
| 6 to 11 inches | Over 11 to 20 inches | Over 20 to 30 inches | Over 30 to 48 inches | Over 48 to 72 inches | ||||||||
| A | B | A | B | A | B | A | B | A | B | |||
| Structural steel (min. tensile strength 60,000 p.s.i.) | 1/2 inch or less | 14,200 SFPM | 1/16 | 1/16 | 3/32 | 3/32 | 1/8 | 1/8 | 3/16 | 3/16 | 1/4 | 1/4 |
| 1/2 inch or less | 16,000 SFPM | 3/32 | 1/8 | 1/8 | 1/8 | 3/16 | 1/8 | 1/4 | 3/16 | 5/16 | 1/4 | |
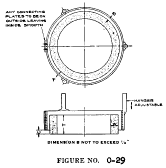
Table O-3 - Guide for Construction of Band Type Guards
[Maximum Wheel Speed 7,000 SFPM]
| Minimum material specifications | Diameter of wheel | Minimum thickness of band A | Minimum diameter of rivets | Maximum distance between centers of rivets |
|---|---|---|---|---|
| Inches | ||||
| Hot rolled steel SAE 1008 | Under 8 | 1/16 | 3/16 | 3/4 |
| 8 to 24 | 1/8 | 1/4 | 1 | |
| Over 24 to 30 | 1/4 | 3/8 | 1 1/4 | |

Table O-5 - Minimum Dimensions for Straight Adaptor Flange - for Organic Bonded Wheels Over 1 1/4 Inches Thick 1
[In inches]
| Wheel diameter | Wheel hole diameter | B - Minimum flange diameter | D - Minimun thickness of flange at bore | E - Minimum thickness of flange at edge of undercut | F 1 - (D-E) minimum thickness |
|---|---|---|---|---|---|
| 12 to 14 | 4 | 6 | 7/8 | 3/8 | 1/2 |
| 5 | 7 | 7/8 | 3/8 | 1/2 | |
| 6 | 8 | 7/8 | 3/8 | 1/2 | |
| Larger than 14 to 18 | 4 | 6 | 7/8 | 3/8 | 1/2 |
| 5 | 7 | 7/8 | 3/8 | 1/2 | |
| 6 | 8 | 7/8 | 3/8 | 1/2 | |
| 7 | 9 | 7/8 | 3/8 | 1/2 | |
| 8 | 10 | 7/8 | 3/8 | 1/2 | |
| Larger than 18 to 24 | 6 | 8 | 1 | 1/2 | 1/2 |
| 7 | 9 | 1 | 1/2 | 1/2 | |
| 8 | 10 | 1 | 1/2 | 1/2 | |
| 10 | 12 | 1 | 1/2 | 1/2 | |
| 12 | 14 | 1 | 1/2 | 1/2 | |
| Larger than 24 to 30 | 12 | 15 | 1 | 1/2 | 1/2 |
| Larger than 30 to 36 | 12 | 15 | 1 3/8 | 7/8 | 1/2 |
1 For wheels under 1 1/4 inches thick F dimension shall not exceed 40 percent of wheel thickness.

Table O-6 - Minimum Dimensions for Straight Relieved Flanges 1
[In inches]
| A - Diameter of wheel | B - Minimum outside diameter of flanges | C - Radial width of bearing surface | D - Minimum thickness of flange at bore | E - Minimum thickness of flange at edge of recess | |
|---|---|---|---|---|---|
| Minimum | Maximum | ||||
| 1 | 3/8 | 1/16 | 1/8 | 1/16 | 1/16 |
| 2 | 3/4 | 1/8 | 3/16 | 1/8 | 3/32 |
| 3 | 1 | 1/8 | 3/16 | 3/16 | 3/32 |
| 4 | 1 3/8 | 1/8 | 3/16 | 3/16 | 1/8 |
| 5 | 1 3/4 | 3/16 | 1/4 | 1/4 | 1/8 |
| 6 | 2 | 1/4 | 1/2 | 3/8 | 3/16 |
| 7 | 2 1/2 | 1/4 | 1/2 | 3/8 | 3/16 |
| 8 | 3 | 1/4 | 1/2 | 3/8 | 3/16 |
| 10 | 3 1/2 | 5/16 | 5/8 | 3/8 | 1/4 |
| 12 | 4 | 5/16 | 5/8 | 1/2 | 5/16 |
| 14 | 4 1/2 | 3/8 | 3/4 | 1/2 | 5/16 |
| 16 | 5 1/2 | 1/2 | 1 | 1/2 | 5/16 |
| 18 | 6 | 1/2 | 1 | 5/8 | 3/8 |
| 20 | 7 | 5/8 | 1 1/4 | 5/8 | 3/8 |
| 22 | 7 1/2 | 5/8 | 1 1/4 | 5/8 | 7/16 |
| 24 | 8 | 3/4 | 1 1/4 | 5/8 | 7/16 |
| 26 | 8 1/2 | 3/4 | 1 1/4 | 5/8 | 1/2 |
| 28 | 10 | 7/8 | 1 1/2 | 3/4 | 1/2 |
| 30 | 10 | 7/8 | 1 1/2 | 3/4 | 5/8 |
| 36 | 12 | 1 | 2 | 7/8 | 3/4 |
| 42 | 14 | 1 | 2 | 7/8 | 3/4 |
| 48 | 16 | 1 1/4 | 2 | 1 1/8 | 1 |
| 60 | 20 | 1 1/4 | 2 | 1 1/4 | 1 1/8 |
| 72 | 24 | 1 1/2 | 2 1/2 | 1 3/8 | 1 1/4 |
1 Flanges for wheels under 2 inches diameter may be unrelieved and shall be maintained flat and true.

Table O-7 - Minimum Dimensions for Straight Flanges - for Mechanical Grinders 12,500 S.F.P.M. to 16,5 S.F.P.M. 1
| Wheel diameter | Wheel hole diameter | B - Minimum flange diameter | D - Minimum thickness of flange at bore | E - Minimum thickness of flange at edge of undercut | F 2 - (D-E) minimum thickness |
|---|---|---|---|---|---|
| 20 | 6 | 8 | 1 | 1/2 | 1/2 |
| 20 | 8 | 10 | 1 1/2 | 3/4 | 3/4 |
| 24 | 12 | 15 | 2 | 1 | 1 |
| 30 | 12 | 15 | 2 | 1 | 1 |
| 36 | 12 | 15 | 2 | 1 |
1 Flanges shall be of steel, quality SAE 1040 or equivalent, annealed plate, heat treated to R. 25-30.
2 For wheels under 1 1/4 inch thick F dimension shall not exceed 40 percent of wheel thickness.

Table O-8 - Minimum Dimensions for Straight Flanges Used as Wheel Sleeves for Precision Grinding Only
[In inches]
| Wheel diameter | Wheel hole diameter | B - Minimum outside diameter of flange | D - Minimum thickness of flange at bore | E - Minimum thickness of flange at edge of undercut |
|---|---|---|---|---|
| 12 to 14 | 5 | 7 | 1/2 | 7/16 |
| Larger than 14 to 20 | 5 | 7 | 5/8 | 7/16 |
| 6 | 8 | 5/8 | 7/16 | |
| 8 | 10 | 5/8 | 7/16 | |
| 10 | 11 1/2 | 5/8 | 7/16 | |
| 12 | 13 1/2 | 5/8 | 7/16 | |
| Larger than 20 to 30 | 8 | 10 | 3/4 | 1/2 |
| 10 | 11 1/2 | 3/4 | 1/2 | |
| 12 | 13 1/2 | 3/4 | 1/2 | |
| 16 | 17 1/2 | 3/4 | 1/2 | |
| Larger than 30 to 42 | 12 | 13 1/2 | 3/4 | 1/2 |
| 16 | 17 1/2 | 3/4 | 1/2 | |
| 18 | 19 1/2 | 3/4 | 1/2 | |
| 20 | 21 1/2 | 3/4 | 1/2 | |
| Larger than 42 to 60 | 16 | 20 | 1 | 3/4 |
| 20 | 24 | 1 | 3/4 | |
| 24 | 29 | 1 1/8 | 7/8 |
Note: These flanges may be clamped together by means of a central nut, or by a series of bolts or some other equivalent means of fastening. For hole sizes smaller than shown in this table, use table 12.
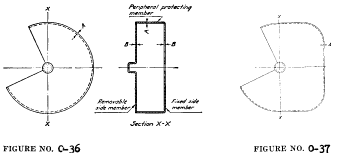
Table O-9 - Minimum Basic Thicknesses of Peripheral and Side Members for Safety Guards
[In inches]
| Material used in construction of guard | Maximum thickness of grinding wheel | Grinding wheel diameters | |||||||||||||
|---|---|---|---|---|---|---|---|---|---|---|---|---|---|---|---|
| 3 to 6 inches | Over 6 to 12 inches | Over 12 to 16 inches | Over 16 to 20 inches | Over 20 to 24 inches | Over 24 to 30 inches | Over 30 to 48 inches | |||||||||
| A | B | A | B | A | B | A | B | A | B | A | B | A | B | ||
| Material | 2 | 1/4 | 1/4 | 3/8 | 5/16 | 1/2 | 3/8 | 5/8 | 1/2 | 7/8 | 5/8 | 1 | 3/4 | 1 1/4 | 1 |
| satis- | 4 | 5/16 | 5/16 | 3/8 | 5/16 | 1/2 | 3/8 | 3/4 | 5/8 | 1 | 5/8 | 1 1/8 | 3/4 | 1 3/8 | 1 |
| factory 1 | 6 | 3/8 | 5/16 | 1/2 | 7/16 | 5/8 | 1/2 | 1 | 5/8 | 1 1/8 | 3/4 | 1 1/4 | 7/8 | 1 1/2 | 1 1/8 |
| for | 8 | 5/8 | 9/16 | 7/8 | 3/4 | 1 | 3/4 | 1 1/8 | 3/4 | 1 1/4 | 7/8 | 1 1/2 | 1 1/8 | ||
| speeds | 10 | 3/4 | 11/16 | 7/8 | 3/4 | 1 | 3/4 | 1 1/8 | 3/4 | 1 1/4 | 7/8 | 1 1/2 | 1 1/8 | ||
| up to | 16 | 1 1/8 | 1 | 1 1/4 | 1 | 1 5/16 | 1 | 1 7/16 | 1 1/16 | 1 3/4 | 1 3/8 | ||||
| 8,000 | 20 | 1 3/8 | 1 1/8 | 1 3/8 | 1 1/8 | 1 1/2 | 1 3/8 | 2 | 1 5/8 | ||||||
| SFPM. | |||||||||||||||
| Cast iron (min. tensile strength 20,000 p.s.i.) Class 20. | |||||||||||||||
| Material | 2 | 1/4 | 1/4 | 3/8 | 5/16 | 1/2 | 3/8 | 5/8 | 1/2 | 3/4 | 5/8 | 7/8 | 3/4 | 1 | 7/8 |
| satis- | 4 | 5/16 | 5/16 | 3/8 | 5/16 | 1/2 | 3/8 | 5/8 | 1/2 | 3/4 | 5/8 | 7/8 | 3/4 | 1 1/8 | 7/8 |
| factory 1 | 6 | 3/8 | 5/16 | 1/2 | 7/16 | 5/8 | 1/2 | 3/4 | 5/8 | 7/8 | 5/8 | 1 | 3/4 | 1 1/4 | 7/8 |
| for | 8 | 1/2 | 7/16 | 5/8 | 1/2 | 3/4 | 5/8 | 7/8 | 5/8 | 1 | 3/4 | 1 1/4 | 7/8 | ||
| speeds | 10 | 1/2 | 7/16 | 5/8 | 1/2 | 3/4 | 5/8 | 7/8 | 5/8 | 1 | 3/4 | 1 1/4 | 7/8 | ||
| up to | 16 | 13/16 | 11/16 | 13/16 | 11/16 | 1 | 3/4 | 1 1/8 | 7/8 | 1 3/8 | 1 | ||||
| 9,000 | 20 | 7/8 | 3/4 | 1 | 3/4 | 1 1/8 | 7/8 | 1 1/2 | 1 1/8 | ||||||
| SFPM. | |||||||||||||||
| Malleable iron (min. tensile strength 50,000 p.s.i.) Grade 32510. | |||||||||||||||
| Materials | 2 | 1/4 | 1/4 | 5/16 | 5/16 | 3/8 | 3/8 | 1/2 | 7/16 | 5/8 | 1/2 | 3/4 | 5/8 | 7/8 | 3/4 |
| satis- | 4 | 1/4 | 1/4 | 1/2 | 1/2 | 1/2 | 1/2 | 9/16 | 1/2 | 5/8 | 1/2 | 3/4 | 5/8 | 1 | 3/4 |
| factory 1 | 6 | 3/8 | 1/4 | 3/4 | 5/8 | 3/4 | 5/8 | 3/4 | 5/8 | 13/16 | 11/16 | 13/16 | 11/16 | 1 1/8 | 3/4 |
| for | 8 | 7/8 | 3/4 | 7/8 | 3/4 | 7/8 | 3/4 | 7/8 | 3/4 | 15/16 | 13/16 | 1 3/8 | 1 | ||
| speeds | 10 | 1 | 7/8 | 1 | 7/8 | 1 | 7/8 | 1 1/8 | 15/16 | 1 1/8 | 1 | 1 7/16 | 1 1/16 | ||
| up to | 16 | 1 1/4 | 1 1/8 | 1 1/4 | 1 1/8 | 1 1/4 | 1 1/8 | 1 1/4 | 1 1/8 | 1 13/16 | 1 7/16 | ||||
| 16,000 | 20 | 1 3/8 | 1 1/4 | 1 3/8 | 1 1/4 | 1 7/16 | 1 5/16 | 2 1/16 | 1 11/16 | ||||||
| SFPM. | |||||||||||||||
| Steel castings (min. tensile strength 60,000 p.s.i.) Grade V60-30. | |||||||||||||||
| Structural | 2 | 1/8 | 1/16 | 5/16 | 1/4 | 5/16 | 1/4 | 5/16 | 1/4 | 5/16 | 1/4 | 3/8 | 5/16 | 1/2 | 3/8 |
| steel | 4 | 1/8 | 1/16 | 3/8 | 5/16 | 3/8 | 5/16 | 3/8 | 5/16 | 3/8 | 5/16 | 3/8 | 5/16 | 1/2 | 3/8 |
| (min. | 6 | 3/16 | 1/16 | 1/2 | 3/8 | 7/16 | 3/8 | 7/16 | 3/8 | 7/16 | 3/8 | 7/16 | 3/8 | 3/4 | 1/2 |
| tensile | 8 | 1/2 | 3/8 | 9/16 | 7/16 | 9/16 | 7/16 | 9 | |||||||
| strength | 10 | 9/16 | 7/16 | 5/8 | 1/2 | 5/8 | 1/2 | 5/8 | 1/2 | 5/8 | 1/2 | 7/8 | 5/8 | ||
| 60,000 | 16 | 5/8 | 9/16 | 3/4 | 5/8 | 3/4 | 5/8 | 13/16 | 11/16 | 1 1/16 | 13/16 | ||||
| p.s.i.) | 20 | 13/16 | 11/16 | 13/16 | 11/16 | 7/8 | 3/4 | 1 3/16 | 15/16 | ||||||
1 The recommendations listed in the above table are guides for the conditions stated. Other material, designs or dimensions affording equal or superior protection are also acceptable.
Table O-2 - Exposure Versus Wheel Thickness
[In inches]
| Overall thickness of wheel (T) | Maximum exposure of wheel (C) |
|---|---|
| 1/2 | 1/4 |
| 1 | 1/2 |
| 2 | 3/4 |
| 3 | 1 |
| 4 | 1 1/2 |
| 5 and over | 2 |
Table O-4 - Minimum Dimensions for Straight Unrelieved Flanges for Wheels with Threaded Inserts or Projecting Studs
| A - Diameter of wheel | B 1 - Minimum outside diameter of flange | T - Minimum thickness of flange |
|---|---|---|
| 1 | 5/8 | 1/8 |
| 2 | 1 | 1/8 |
| 3 | 1 | 3/16 |
| 4 | 1 3/8 | 3/16 |
| 5 | 1 3/4 | 1/4 |
| 6 | 2 | 3/8 |
1 Note: Must be large enough to extend beyond the bushing. Where prong anchor or cupback bushing are used, this footnote does not apply.