Appendix E to Subpart L of Part 1910 - Test Methods for Protective Clothing
29:5.1.1.1.8.12.37.12.13 : Appendix E
Appendix E to Subpart L of Part 1910 - Test Methods for Protective
Clothing
This appendix contains test methods which must be used to
determine if protective clothing affords the required level of
protection as specified in § 1910.156, fire brigades.
(1) Puncture resistance test method for foot
protection.
A. Apparatus. The puncture resistance test shall be
performed on a testing machine having a movable platform adjusted
to travel at 1/4-inch/min (0.1 cm/sec). Two blocks of hardwood,
metal, or plastic shall be prepared as follows: the blocks shall be
of such size and thickness as to insure a suitable rigid test
ensemble and allow for at least one-inch of the pointed end of an
8D nail to be exposed for the penetration. One block shall have a
hole drilled to hold an 8D common nail firmly at an angle of 98°.
The second block shall have a maximum 1/2-inch (1.3 cm) diameter
hole drilled through it so that the hole will allow free passage of
the nail after it penetrates the insole during the test.
B. Procedure. The test ensemble consisting of the sample
unit, the two prepared blocks, a piece of leather outsole 10 to 11
irons thick, and a new 8D nail, shall be placed as follows: the 8D
nail in the hole, the sample of outsole stock superimposed above
the nail, the area of the sole plate to be tested placed on the
outsole, and the second block with hole so placed as to allow for
free passage of the nail after it passes through the outsole stock
and sole plate in that order. The machine shall be started and the
pressure, in pounds required for the nail to completely penetrate
the outsole and sole plate, recorded to the nearest five pounds.
Two determinations shall be made on each sole plate and the results
averaged. A new nail shall be used for each determination.
C. Source. These test requirements are contained in
“Military Specification For Fireman's Boots,” MIL-B-2885D (1973 and
amendment dated 1975) and are reproduced for your convenience.
(2) Test method for determining the strength of cloth by
tearing: Trapezoid Method.
A. Test specimen. The specimen shall be a rectangle of
cloth 3-inches by 6-inches (7.6 cm by 15.2 cm). The long dimension
shall be parallel to the warp for warp tests and parallel to the
filling for filling tests. No two specimens for warp tests shall
contain the same warp yarns, nor shall any two specimens for
filling tests contain the same filling yarns. The specimen shall be
taken no nearer the selvage than 1/10 the width of the cloth. An
isosceles trapezoid having an altitude of 3-inches (7.6 cm) and
bases of 1 inch (2.5cm) and 4 inches (10.2 cm) in length,
respectively, shall be marked on each specimen, preferably with the
aid of a template. A cut approximately 3/8-inch (1 cm) in length
shall then be made in the center of a perpendicular to the 1-inch
(2.5 cm) edge.
B. Apparatus. (i) Six-ounce (.17 kg) weight tension
clamps shall be used so designed that the six ounces (.17 kg) of
weight are distributed evenly across the complete width of the
sample.
(ii) The machine shall consist of three main parts: Straining
mechanism, clamps for holding specimen, and load and elongation
recording mechanisms.
(iii) A machine wherein the specimen is held between two clamps
and strained by a uniform movement of the pulling clamp shall be
used.
(iv) The machine shall be adjusted so that the pulling clamp
shall have a uniform speed of 12 ±10.5 inches per minute (0.5 ±.02
cm/sec).
(v) The machine shall have two clamps with two jaws on each
clamp. The design of the two clamps shall be such that one gripping
surface or jaw may be an integral part of the rigid frame of the
clamp or be fastened to allow a slight vertical movement, while the
other gripping surface or jaw shall be completely moveable. The
dimension of the immovable jaw of each clamp parallel to the
application of the load shall measure one-inch, and the dimension
of the jaw perpendicular to this direction shall measure three
inches or more. The face of the movable jaw of each clamp shall
measure one-inch by three inches.
Each jaw face shall have a flat smooth, gripping surface. All
edges which might cause a cutting action shall be rounded to a
radius of not over 1/64-inch (.04 cm). In cases where a cloth tends
to slip when being tested, the jaws may be faced with rubber or
other material to prevent slippage. The distance between the jaws
(gage length) shall be one-inch at the start of the test.
(vi) Calibrated dial; scale or chart shall be used to indicate
applied load and elongation. The machine shall be adjusted or set,
so that the maximum load required to break the specimen will remain
indicated on the calibrated dial or scale after the test specimen
has ruptured.
(vii) The machine shall be of such capacity that the maximum
load required to break the specimen shall be not greater than 85
percent or less than 15 percent of the rated capacity.
(viii) The error of the machine shall not exceed 2 percent up to
and including a 50-pound load (22.6 kg) and 1 percent over a
50-pound load (22.6 kg) at any reading within its loading
range.
(ix) All machine attachments for determining maximum loads shall
be disengaged during this test.
C. Procedure. (i) The specimen shall be clamped in the
machine along the nonparallel sides of the trapezoid so that these
sides lie along the lower edge of the upper clamp and the upper
edge of the lower clamp with the cut halfway between the clamps.
The short trapezoid base shall be held taut and the long trapezoid
base shall lie in the folds.
(ii) The machine shall be started and the force necessary to
tear the cloth shall be observed by means of an autographic
recording device. The speed of the pulling clamp shall be 12 inches
±0.5 inch per minute (0.5 ±.02 cm/sec).
(iii) If a specimen slips between the jaws, breaks in or at the
edges of the jaws, or if for any reason attributable to faulty
technique, an individual measurement falls markedly below the
average test results for the sample unit, such result shall be
discarded and another specimen shall be tested.
(iv) The tearing strength of the specimen shall be the average
of the five highest peak loads of resistance registered for 3
inches (7.6 cm) of separation of the tear.
D. Report. (i) Five specimens in each of the warp and
filling directions shall be tested from each sample unit.
(ii) The tearing strength of the sample unit shall be the
average of the results obtained from the specimens tested in each
of the warp and filling directions and shall be reported separately
to the nearest 0.1-pound (.05 kg).
E. Source. These test requirements are contained in
“Federal Test Method Standard 191, Method 5136” and are reproduced
for your convenience.
(3) Test method for determining flame resistance of cloth;
vertical.
A. Test specimen. The specimen shall be a rectangle of
cloth 2 3/4 inches (7.0 cm) by 12 inches (30.5 cm) with the long
dimension parallel to either the warp or filling direction of the
cloth. No two warp specimens shall contain the same warp yarns, and
no two filling specimens shall contain the same filling yarn.
B. Number of determinations. Five specimens from each of
the warp and filling directions shall be tested from each sample
unit.
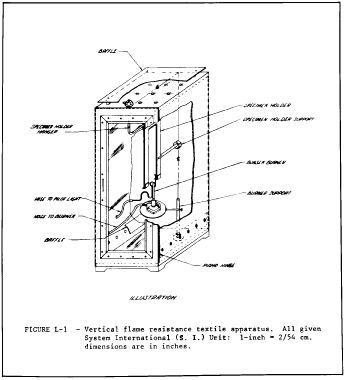
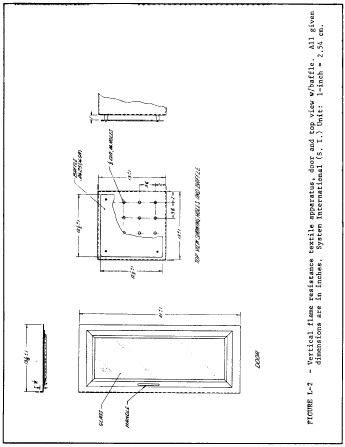
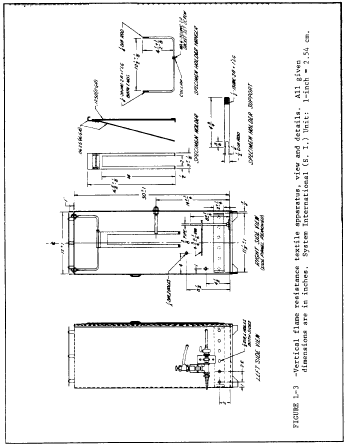
C. Apparatus. (i) Cabinet. A cabinet and accessories
shall be fabricated in accordance with the requirements specified
in Figures L-1, L-2, and L-3. Galvanized sheet metal or other
suitable metal shall be used. The entire inside back wall of the
cabinet shall be painted black to facilitate the viewing of the
test specimen and pilot flame.
(ii) Burner. The burner shall be equipped with a variable
orifice to adjust the flame height, a barrel having a 3/8-inch (1
cm) inside diameter and a pilot light.
(a) The burner may be constructed by combining a 3/8-inch (1 cm)
inside diameter barrel 3 ± 1/4 inches (7.6 ±.6 cm) long from a
fixed orifice burner with a base from a variable orifice
burner.
(b) The pilot light tube shall have a diameter of approximately
1/16-inch (.2 cm) and shall be spaced 1/8-inch (.3 cm) away from
the burner edge with a pilot flame 1/8-inch (.3 cm) long.
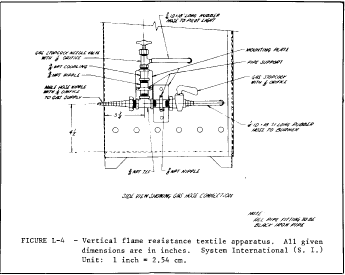
(c) The necessary gas connections and the applicable plumbing
shall be as specified in Figure L-4 except that a solenoid valve
may be used in lieu of the stopcock valve to which the burner is
attached. The stopcock valve or solenoid valve, whichever is used,
shall be capable of being fully opened or fully closed in
0.1-second.
(d) On the side of the barrel of the burner, opposite the pilot
light there shall be a metal rod of approximately 1/8-inch (.3 cm)
diameter spaced 1/2-inch (1.3 cm) from the barrel and extending
above the burner. The rod shall have two 5/16-inch (.8 cm) prongs
marking the distances of 3/4-inch (1.9 cm) and 1 1/2 inches (3.8
cm) above the top of the burner.
(e) The burner shall be fixed in a position so that the center
of the barrel of the burner is directly below the center of the
specimen.
(iii) There shall be a control valve system with a delivery rate
designed to furnish gas to the burner under a pressure of 2 1/2 ±
1/4 (psi) (17.5 ±1.8 kPa) per square inch at the burner inlet (see
(g)(3)(vi)(A)). The manufacturer's recommended delivery rate for
the valve system shall be included in the required pressure.
(iv) A synthetic gas mixture shall be of the following
composition within the following limits (analyzed at standard
conditions): 55 ±3 percent hydrogen, 24 ±1 percent methane, 3 ±1
percent ethane, and 18 ±1 percent carbon monoxide which will give a
specific gravity of 0.365 ±0.018 (air = 1) and a B.T.U. content of
540 ±20 per cubic foot (20.1 ±3.7 kJ/L)(dry basis) at 69.8 °F (21
°C).
(v) There shall be metal hooks and weights to produce a series
of total loads to determine length of char. The metal hooks shall
consist of No. 19 gage steel wire or equivalent and shall be made
from 3-inch (7.6 cm) lengths of wire and bent 1/2-inch (1.3 cm)
from one end to a 45 degree hook. One end of the hook shall be
fastened around the neck of the weight to be used.
(vi) There shall be a stop watch or other device to measure the
burning time to 0.2-second.
(vii) There shall be a scale, graduated in 0.1 inch (.3 cm) to
measure the length of char.
D. Procedure. (i) The material undergoing test shall be
evaluated for the characteristics of after-flame time and char
length on each specimen.
(ii) All specimens to be tested shall be at moisture equilibrium
under standard atmospheric conditions in accordance with paragraph
(3)C of this appendix. Each specimen to be tested shall be exposed
to the test flame within 20 seconds after removal from the standard
atmosphere. In case of dispute, all testing will be conducted under
Standard Atmospheric Conditions in accordance with paragraph (3)C
of this appendix.
(iii) The specimen in its holder shall be suspended vertically
in the cabinet in such a manner that the entire length of the
specimen is exposed and the lower end is 3/4-inch (1.9 cm) above
the top of the gas burner. The apparatus shall be set up in a draft
free area.
(iv) Prior to inserting the specimen, the pilot flame shall be
adjusted to approximately 1/8-inch (.3 cm) in height measured from
its lowest point to the tip.
The burner flame shall be adjusted by means of the needle valve
in the base of the burner to give a flame height of 1 1/2 inches
(3.8 cm) with the stopcock fully open and the air supply to the
burner shut off and taped. The 1 1/2-inch (3.8 cm) flame height is
obtained by adjusting the valve so that the uppermost portion (tip)
of the flame is level with the tip of the metal prong (see Figure
L-2) specified for adjustment of flame height. It is an important
aspect of the evaluation that the flame height be adjusted with the
tip of the flame level with the tip of the metal prong. After
inserting the specimen, the stopcock shall be fully opened, and the
burner flame applied vertically at the middle of the lower edge of
the specimen for 12 seconds and the burner turned off. The cabinet
door shall remain shut during testing.
(v) The after-flame shall be the time the specimen continues to
flame after the burner flame is shut off.
(vi) After each specimen is removed, the test cabinet shall be
cleared of fumes and smoke prior to testing the next specimen.
(vii) After both flaming and glowing have ceased, the char
length shall be measured. The char length shall be the distance
from the end of the specimen, which was exposed to the flame, to
the end of a tear (made lengthwise) of the specimen through the
center of the charred area as follows: The specimen shall be folded
lengthwise and creased by hand along a line through the highest
peak of the charred area. The hook shall be inserted in the
specimen (or a hole, 1/4-inch (.6 cm) diameter or less, punched out
for the hook) at one side of the charred area 1/4-inch (.6 cm) from
the adjacent outside edge and 1/4-inch (.6 cm) in from the lower
end. A weight of sufficient size such that the weight and hook
together shall equal the total tearing load required in Table L-2
of this section shall be attached to the hook.
(viii) A tearing force shall be applied gently to the specimen
by grasping the corner of the cloth at the opposite edge of the
char from the load and raising the specimen and weight clear of the
supporting surface. The end of the tear shall be marked off on the
edge and the char length measurement made along the undamaged
edge.
Loads for determining char length applicable to the weight of
the test cloth shall be as shown in Table L-2.
| Specified weight per square
yard of cloth before any fire retardant treatment or coating -
ounces |
Total tearing weight for
determining the charred length - pound |
| 2.0 to 6.0 |
0.25 |
| Over 6.0 to
15.0 |
0.50 |
| Over 15.0 to
23.0 |
0.75 |
| Over 23.0 |
1.0 |
(ix) The after-flame time of the specimen shall be recorded to
the nearest 0.2-second and the char length to the nearest 0.1-inch
(.3 cm).
E. Report. (i) The after-flame time and char length of
the sample unit shall be the average of the results obtained from
the individual specimens tested. All values obtained from the
individual specimens shall be recorded.
(ii) The after-flame time shall be reported to the nearest
0.2-second and the char length to the nearest 0.1-inch (.3 cm).
F. Source. These test requirements are contained in
“Federal Test Method Standard 191, Method 5903 (1971)” and are
reproduced for your convenience.
[45 FR 60715,
Sept. 12, 1980; 46 FR 24557, May 1, 1981]


 [45 FR 60715,
Sept. 12, 1980; 46 FR 24557, May 1, 1981]