Title 30
SECTION 7.86
7.86 Test equipment and specifications.
§ 7.86 Test equipment and specifications.(a) Dynamometer test cell shall be used in determining the maximum f/a ratio, gaseous ventilation rates, and the particulate index.
(1) The following testing devices shall be provided:
(i) An apparatus for measuring torque that provides an accuracy of ±2.0 percent based on the engine's maximum value;
(ii) An apparatus for measuring revolutions per minute (rpm) that provides an accuracy of ±2.0 percent based on the engine's maximum value;
(iii) An apparatus for measuring temperature that provides an accuracy of ±4 °F (2 °C) of the absolute value except for the exhaust gas temperature device that provides an accuracy of ±27 °F (15 °C);
(iv) An apparatus for measuring intake and exhaust restriction pressures that provides an accuracy of ±5 percent of maximum;
(v) An apparatus for measuring atmospheric pressure that provides an accuracy of ±0.5 percent of reading;
(vi) An apparatus for measuring fuel flow that provides an accuracy of ±2 percent based on the engine's maximum value;
(vii) An apparatus for measuring the inlet air flow rate of the diesel engine that provides an accuracy of ±2 percent based on the engine's maximum value; and
(viii) For testing category A engines, an apparatus for metering in 1.0 ±0.1 percent, by volume, of methane (CH4) into the intake air system shall be provided.
(2) The test fuel specified in Table E-1 shall be a low volatile hydrocarbon fuel commercially designated as “Type 2-D” grade diesel fuel. The fuel may contain nonmetallic additives as follows: Cetane improver, metal deactivator, antioxidant, dehazer, antirust, pour depressant, dye, dispersant, and biocide.
Table E-1 - Diesel Test Fuel Specifications
| Item | ASTM | Type 2-D |
|---|---|---|
| Cetane number | D613 | 40-48 |
| Cetane index | D976 | 40-48 |
| Distillation range: | ||
| IBP °F | D86 | 340-400 |
| (°C) | (171.1-204.4) | |
| 10 pct. point, °F | D86 | 400-460 |
| (°C) | (204.4-237.8) | |
| 50 pct. point, °F | D86 | 470.540 |
| (°C) | (243.3-282.2) | |
| 90 pct. point, °F | D86 | 560-630 |
| (°C) | (293.3-332.2) | |
| EP, °F | D86 | 610-690 |
| (°C) | (321.1-365.6) | |
| Gravity,°API | D287 | 32-37 |
| Total sulfur, pct. | D2622 | 0.03-0.05 |
| Hydrocarbon composition: | ||
| Aromatics, pct. | D1319 | 27 minimum |
| Paraffins, naphthenes, olefins | D1319 | Remainder |
| Flashpoint, minimum, °F | 93 | 130 |
| (°C) | (54.4) | |
| Viscosity, centistokes | 445 | 2.0-3.2 |
(3) The test fuel temperature at the inlet to the diesel engine's fuel injection pump shall be controlled to the engine manufacturer's specification.
(4) The engine coolant temperature (if applicable) shall be maintained at normal operating temperatures as specified by the engine manufacturer.
(5) The charge air temperature and cooler pressure drop (if applicable) shall be set to within ±7 °F(4 °C) and ±0.59 inches Hg (2kPa) respectively, of the manufacturer's specification.
(b) Gaseous emission sampling system shall be used in determining the gaseous ventilation rates.
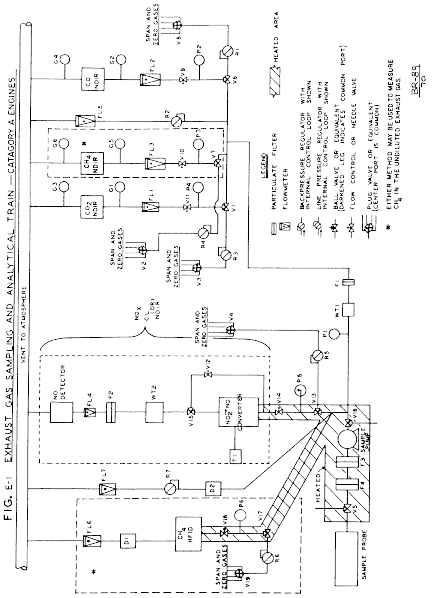
(1) The schematic of the gaseous sampling system shown in Figure E-1 shall be used for testing category A engines. Various configurations of Figure E-1 may produce equivalent results. The components in Figure E-1 are designated as follows -
(i) Filters - F1, F2, F3, and F4;
(ii) Flowmeters - FL1, FL2, FL3, FL4, FL5, FL6, and FL7;
(iii) Upstream Gauges - G1, G2, and G5;
(iv) Downstream Gauges - G3, G4, and G6;
(v) Pressure Gauges - P1, P2, P3, P4, P5, and P6;
(vi) Regulators - R1, R2, R3, R4, R5, R6, and R7;
(vii) Selector Valves - V1, V2, V3, V4, V6, V7, V8, V15, and V19;
(viii) Heated Selector Valves - V5, V13, V16, and V17;
(ix) Flow Control Valves - V9, V10, V11 and V12;
(x) Heated Flow Control Valves - V14 and V18;
(xi) Pump - Sample Transfer Pump;
(xii) Temperature Sensor - (T1);
(xiii) Dryer - D1 and D2; and
(xiv) Water traps - WT1 and WT2.
(A) Water removal from the sample shall be done by condensation.
(B) The sample gas temperature or dew point shall be monitored either within the water trap or downstream of the water trap and shall not exceed 45 °F (7 °C).
(C) Chemical dryers are not permitted.

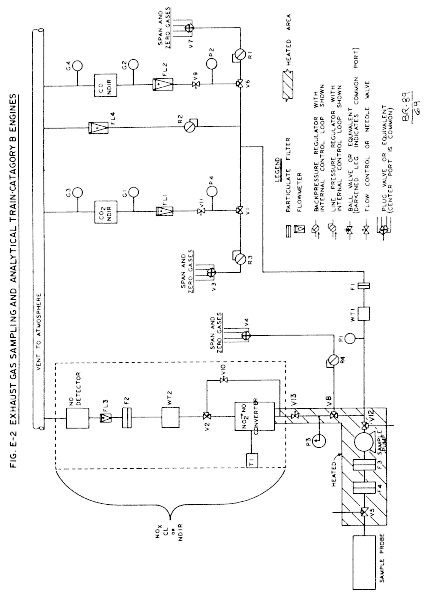
(2) The schematic of the gaseous sampling system shown in Figure E-2 shall be used for testing category B engines. Various configurations of Figure E-2 may produce equivalent results. The components are designated as follows -
(i) Filters - F1, F2, F3, and F4;
(ii) Flowmeters - FL1, FL2, FL3, and FL4;
(iii) Upstream Gauges - G1, and G2;
(iv) Downstream Gauges - G3, and G4;
(v) Pressure Gauges - P1, P2, P3, and P4;
(vi) Regulators - R1, R2, R3, and R4;
(vii) Selector Valves - V1, V2, V3, V4, V6, and V7;
(viii) Heated Selector Valves - V5, V8, and V12;
(ix) Flow Control Valves - V9, V10, V11;
(x) Heated Flow Control Valves - V13;
(xi) Pump - Sample Transfer Pump;
(xii) Temperature Sensor - (T1); and
(xiii) Water traps - WT1 and WT2.
(A) Water removal from the sample shall be done by condensation.
(B) The sample gas temperature or dew point shall be monitored either within the water trap or downstream of the water trap and shall not exceed 45 °F (7 °C).
(C) Chemical dryers are not permitted.
(3) All components or parts of components that are in contact with the sample gas or corrosive calibration gases shall be corrosion-resistant material.

(4) All analyzers shall obtain the sample to be analyzed from the same sample probe.
(5) CO and CO2 measurements shall be made on a dry basis.
(6) Calibration or span gases for the NOX measurement system shall pass through the NO2 to NO converter.
(7) A stainless steel sample probe shall be straight, closed-end, multi-holed, and shall be placed inside the exhaust pipe.
(i) The probe length shall be at least 80 percent of the diameter of the exhaust pipe.
(ii) The inside diameter of the sample probe shall not be greater than the inside diameter of the sample line.
(iii) The heated sample line shall have a 0.197 inch (5 mm) minimum and a 0.53 inch (13.5 mm) maximum inside diameter.
(iv) The wall thickness of the probe shall not be greater than 0.040 inch (1 mm).
(v) There shall be a minimum of 3 holes in 3 different radial planes sized to sample approximately the same flow.
(8) The sample probe shall be located in the exhaust pipe at a minimum distance of 1.6 feet (0.5 meters) or 3 times the diameter of the exhaust pipe, whichever is the larger, from the exhaust manifold outlet flange or the outlet of the turbocharger. The exhaust gas temperature at the sample probe shall be a minimum of 158 °F (70 °C).
(9) The maximum allowable leakage rate on the vacuum side of the analyzer pump shall be 0.5 percent of the in-use flow rate for the portion of the system being checked.
(10) General analyzer specifications. (i) The total measurement error, including the cross sensitivity to other gases, (paragraphs (b)(11)(ii), (b)(12)(iii), (b)(13)(iii), and (b)(13)(iv) of this section), shall not exceed ±5 percent of the reading or ±3.5 percent of full scale, whichever is smaller. For concentrations of less than 100 ppm the measurement error shall not exceed ±4 ppm.
(ii) The repeatability, defined as 2.5 times the standard deviation of 10 repetitive responses to a given calibration or span gas, must be no greater than ±1 percent of full scale concentration for each range used above 155 parts per million (ppm) or parts per million equivalent carbon (ppmC) or ±2 percent of each range used below 155 ppm (or ppmC).
(iii) The analyzer peak to peak response to zero and calibration or span gases over any 10 second period shall not exceed 2 percent of full scale on all ranges used.
(iv) The analyzer zero drift during a 1-hour period shall be less than 2 percent of full scale on the lowest range used. The zero-response is the mean response, including noise, to a zero gas during a 30-second time interval.
(v) The analyzer span drift during a 1-hour period shall be less than 2 percent of full scale on the lowest range used. The analyzer span is defined as the difference between the span response and the zero response. The span response is the mean response, including noise, to a span gas during a 30-second time interval.
(11) CO and CO2 analyzer specifications. (i) Measurements shall be made with nondispersive infrared (NDIR) analyzers.
(ii) For the CO analyzer, the water and CO2 interference shall be less than 1 percent of full scale for ranges equal to or greater than 300 ppm (3 ppm for ranges below 300 ppm) when a CO2 span gas concentration of 80 percent to 100 percent of full scale of the maximum operating range used during testing is bubbled through water at room temperature.
(12) For NOX analysis using a chemiluminescence (CL) analyzer the following parameters shall apply:
(i) From the sample point to the NO2 to NO converter, the NOX sample shall be maintained between 131 °F (55 °C) and 392 °F (200 °C).
(ii) The NO2 to NO converter efficiency shall be at least 90 percent.
(iii) The quench interference from CO2 and water vapor must be less than 3.0 percent.
(13) For NOX analysis using an NDIR analyzer system the following parameters shall apply:
(i) The system shall include a NO2 to NO converter, a water trap, and a NDIR analyzer.
(ii) From the sample point to the NO2 to NO converter, the NOX sample shall be maintained between 131 °F (55 °C) and 392 °F (200 °C).
(iii) The minimum water rejection ratio (maximum water interference) for the NOX NDIR analyzer shall be 5,000:1.
(iv) The minimum CO2 rejection ratio (maximum CO2 interference) for the NOX NDIR analyzer shall be 30,000:1.
(14) When CH4 is measured using a heated flame ionization detector (HFID) the following shall apply:
(i) The analyzer shall be equipped with a constant temperature oven that houses the detector and sample-handling components.
(ii) The detector, oven, and sample-handling components shall be suitable for continuous operation at temperatures of 374 °F (190 °C) ±18 °F (10 °C).
(iii) The analyzer fuel shall contain 40 ±2 percent hydrogen. The balance shall be helium. The mixture shall contain ≤1 part per million equivalent carbon (ppmC), and ≤400 ppm CO.
(iv) The burner air shall contain <2 ppmC hydrocarbon.
(v) The percent of oxygen interference shall be less than 5 percent.
(15) An NDIR analyzer for measuring CH4 may be used in place of the HFID specified in paragraph (b)(14) of this section and shall conform to the requirements of paragraph (b)(10) of this section. Methane measurements shall be made on a dry basis.
(16) Calibration gas values shall be traceable to the National Institute for Standards and Testing (NIST), “Standard Reference Materials” (SRM's). The analytical accuracy of the calibration gas values shall be within 2.0 percent of NIST gas standards.
(17) Span gas values shall be traceable to NIST SRM's. The analytical accuracy of the span gas values shall be within 2.0 percent of NIST gas standards.
(18) Calibration or span gases for the CO and CO2 analyzers shall have purified nitrogen as a diluent. Calibration or span gases for the CH4 analyzer shall be CH4 with purified synthetic air or purified nitrogen as diluent.
(19) Calibration or span gases for the NOX analyzer shall be NO with a maximum NO2 concentration of 5 percent of the NO content. Purified nitrogen shall be the diluent.
(20) Zero-grade gases for the CO, CO2, CH4 , and NOX analyzers shall be either purified synthetic air or purified nitrogen.
(21) The allowable zero-grade gas (purified synthetic air or purified nitrogen) impurity concentrations shall not exceed ≤1ppm C, ≤1 ppm CO, ≤400 ppm CO2, and ≤0.1 ppm NO.
(22) The calibration and span gases may also be obtained by means of a gas divider. The accuracy of the mixing device must be such that the concentration of the diluted calibration gases are within 2 percent.
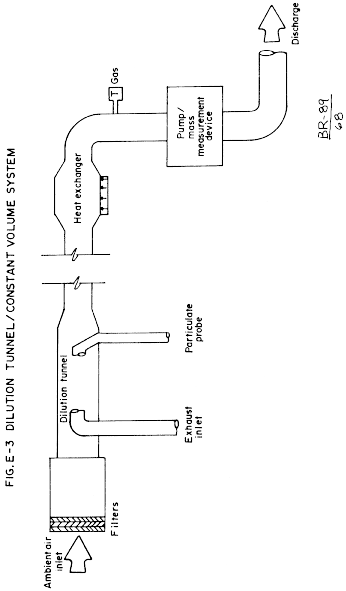
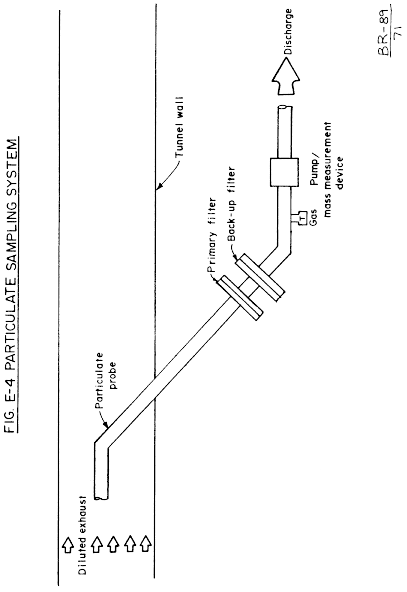
(c) Particulate sampling system shall be used in determining the particulate index. A schematic of a full flow (single dilution) particulate sampling system for testing under this subpart is shown in Figures E-3 and E-4.
(1) The dilution system shall meet the following parameters:
(i) Either a positive displacement pump (PDP) or a critical flow venturi (CFV) shall be used as the pump/mass measurement device shown in Figure E-3.
(ii) The total volume of the mixture of exhaust and dilution air shall be measured.
(iii) All parts of the system from the exhaust pipe up to the filter holder, which are in contact with raw and diluted exhaust gas, shall be designed to minimize deposition or alteration of the particulate.
(iv) All parts shall be made of electrically conductive materials that do not react with exhaust gas components.
(v) All parts shall be electrically grounded to prevent electrostatic effects.
(vi) Systems other than full flow systems may also be used provided they yield equivalent results where:
(A) A seven sample pair (or larger) correlation study between the system under consideration and a full flow dilution system shall be run concurrently.
(B) Correlation testing is to be performed at the same laboratory, test cell, and on the same engine.
(C) The equivalency criterion is defined as a ±5 percent agreement of the sample pair averages.
(2) The mass of particulate in the exhaust shall be collected by filtration. The exhaust temperature immediately before the primary particulate filter shall not exceed 125 °F (52.0 °C).
(3) Exhaust system backpressure shall not be artificially lowered by the PDP, CFV systems or dilution air inlet system. Static exhaust backpressure measured with the PDP or CFV system operating shall remain within ±0.44 inches Hg (1.5 kPa) of the static pressure measured without being connected to the PDP or CFV at identical engine speed and load.
(4) The gas mixture temperature shall be measured at a point immediately ahead of the pump or mass measurement device.
(i) Using PDP, the gas mixture temperature shall be maintained within ±10 °F (6.0 °C) of the average operating temperature observed during the test, when no flow compensation is used.
(ii) Flow compensation can be used provided that the temperature at the inlet to the PDP does not exceed 122 °F (50 °C).
(iii) Using CFV, the gas mixture temperature shall be maintained within ±20 °F (11 °C) of the average operating temperature observed during the test, when no flow compensation is used.
(5) The heat exchanger shall be of sufficient capacity to maintain the temperature within the limits required above and is optional if electronic flow compensation is used.
(6) When the temperature at the inlet of either the PDP or CFV exceeds the limits stated in either paragraphs (c)(4)(i) or (c)(4)(iii) of this section, an electronic flow compensation system shall be required for continuous measurement of the flow rate and control of the proportional sampling in the particulate sampling system.
(7) The flow capacity of the system shall be large enough to eliminate water condensation.


(8) The flow capacity of the PDP or CFV system using single dilution shall maintain the diluted exhaust at 125 °F (52.0 °C) or less immediately before the primary particulate filter.
(9) The flow capacity of the PDP or CFV system using a double dilution system shall be sufficient to maintain the diluted exhaust in the dilution tunnel at 375 °F (191 °C) or less at the sampling zone.
(10) The secondary dilution system shall provide sufficient secondary dilution air to maintain the double-diluted exhaust stream at 125 °F (52.0 °C) or less immediately before the primary particulate filter.
(11) The gas flow meters or the mass flow measurement instrumentation shall have a maximum error of the measured value within ±2 percent of reading.
(12) The dilution air shall have a temperature of 77 °F ±9 °F (25 °C ±5 °C), and be -
(i) Filtered at the air inlet; or
(ii) Sampled to determine background particulate levels, which can then be subtracted from the values measured in the exhaust stream.
(13) The dilution tunnel shall have the following specifications:
(i) Be small enough in diameter to cause turbulent flow (Reynolds number greater than 4,000) and of sufficient length to cause complete mixing of the exhaust and dilution air;
(ii) Be at least 3 inches (75 mm) in diameter; and
(iii) Be configured to direct the engine exhaust downstream at the point where it is introduced into the dilution tunnel for thorough mixing.
(14) The exhaust pipe length from the exit of the engine exhaust manifold or turbocharger outlet to the dilution tunnel shall not exceed a total length of 32 feet (10 m).
(i) When the exhaust pipe exceeds 12 feet (4 m), then all pipe in excess of 12 feet (4 m) shall be insulated with a radial thickness of at least 1.0 inch (25 mm) and the thermal conductivity of the insulating material shall be no greater than 0.1 W/mK measured at 752 °F (400 °C).
(ii) To reduce the thermal inertia of the exhaust pipe, the thickness to diameter ratio shall be 0.015 or less.
(iii) The use of flexible sections shall be limited to the length to diameter ratio of 12 or less.
(15) The particulate sample probe shall -
(i) Be installed in the dilution tunnel facing upstream, on the dilution tunnel centerline, and approximately 10 dilution tunnel diameters downstream of the point where the engine's exhaust enters the dilution tunnel; and
(ii) Have 0.5 inches (12 mm) minimum inside diameter.
(16) The inlet gas temperature to the particulate sample pump or mass measurement device shall remain a constant temperature of ±5 °F (3.0 °C) if flow compensation is not used.
(17) The secondary dilution portion of the double dilution system shall have:
(i) A particulate transfer tube shall have a 0.5 inch (12 mm) minimum inside diameter not to exceed 40 inches (1020 mm) in length measured from the probe tip to the secondary dilution tunnel has:
(A) An inlet with the transfer tube facing upstream in the primary dilution tunnel, centerline, and approximately 10 dilution tunnel diameters downstream of the point where the engine's exhaust enters the dilution tunnel.
(B) An outlet where the transfer tube exits on the centerline of the secondary tunnel and points downstream.
(ii) A secondary tunnel that has a minimum diameter of 3.0 inches (75 mm), and of sufficient length to provide a residence time of at least 0.25 seconds for the double-diluted sample.
(iii) Secondary dilution air supplied at a temperature of 77 °F ±9 °F (25 °C ±5 °C).
(iv) A primary filter holder located within 12.0 inches (300 mm) of the exit of the secondary tunnel.
(18) The particulate sampling filters shall -
(i) Be fluorocarbon-coated glass fiber filters or fluorocarbon-based (membrane) filters and have a 0.3 µm di-octylphthalate (DOP) collection efficiency of at least 95 percent at a gas face velocity between 35 and 80 cm/s.;
(ii) Have a minimum diameter of 1.85 inches (47 mm), 1.46 inches (37 mm) stain diameter;
(iii) Have a minimum filter loading ratio of 0.5mg/1075 mm 2 stain area for the single filter method.
(iv) Have minimum filter loading such that the sum of all eight (8) multiple filters is equal to the minimum loading value (mg) for a single filter multiplied by the square root of eight (8).
(v) Be sampled at the same time by a pair of filters in series (one primary and one backup filter) so that:
(A) The backup filter holder shall be located no more than 4 inches (100 mm) downstream of the primary filter holder.
(B) The primary and backup filters shall not be in contact with each other.
(C) The filters may be weighed separately or as a pair with the filters placed stain side to stain side.
(D) The single filter method incorporates a bypass system for passing the sample through the filters at the desired time.
(vi) Have a pressure drop increase between the beginning and end of the test of no more than 7.4 in Hg (25kPa).
(vii) Filters of identical quality shall be used when performing correlation tests specified in paragraph (c)(1)(vi) of this section.
(19) Weighing chamber specifications. (i) The temperature of the chamber (room) in which the particulate filters are conditioned and weighed shall be maintained to within 72 °F ±5 °F (22 °C ±3 °C) during all filter conditioning and weighing.
(ii) The humidity of the chamber (room) in which the particulate filters are conditioned and weighed shall be maintained to a dewpoint of 49 °F ±5 °F (9.5 °C ±3 °C) and a relative humidity of 45 percent ±8 percent during all filter conditioning and weighing.
(iii) The chamber (room) environment shall be free of any ambient contaminants (such as dust) that would settle on the particulate filters during their stabilization. This shall be determined as follows:
(A) At least two unused reference filters or reference filter pairs shall be weighed within four (4) hours of, but preferably at the same time as the sample filter (pair) weighings.
(B) The reference filters are to be the same size and material as the sample filters.
(C) If the average weight of reference filters (reference filter pairs) changes between sample filter weighings by more than ±5.0 percent (±7.5 percent for the filter pair respectively) of the recommended minimum filter loading in paragraphs (c)(18)(iii) or (c)(18)(iv) of this section, then all sample filters shall be discarded and the tests repeated.
(20) The analytical balance used to determine the weights of all filters shall have a precision (standard deviation) of 20 µg and resolution of 10 µg. For filters less than 70 mm diameter, the precision and resolution shall be 2 µg and 1 µg, respectively.
(21) All filters shall be neutralized to eliminate the effects of static electricity prior to weighing.