Title 46
SECTION 57.06-4
57.06-4 Production testing specimen requirements.
§ 57.06-4 Production testing specimen requirements.(a) For test plates three-fourths inch or less in thickness one reduced section tensile specimen and two free-bend specimens shall be tested. For plates exceeding three-fourths inch in thickness one reduced section tensile specimen, one free-bend specimen and one guided side bend specimen shall be tested. In addition boiler drums of thickness five-eighths inch or greater shall have a tension test specimen of the weld metal as required by paragraph (f)(2) of this section. Toughness tests are required for Classes I-L and II-L pressure vessels as specified in § 57.06-5.
(b) The test plates shall be so supported that the warping due to welding shall not throw the finished test plate out of line by an angle of over 5°.
(c) Where the welding has warped the test plates, the plates shall be straightened before being stress-relieved. The test plates shall be subjected to the same stress-relieving operation as required by this subchapter for the pressure vessel itself. At no time shall the test plates be heated to a temperature higher than that used for stress-relieving the vessel.
(d) The bend specimens shall be taken from opposite sides of the reduced-section tensile specimen in their respective test plates as shown in Figures 57.06-4(d)(1) and 57.06-4(d)(2).
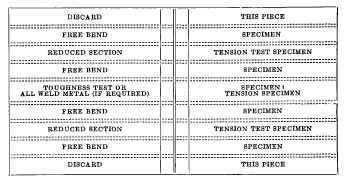 Figure
57.06-4(d)(1) - Workmanship test plates for material three-fourths
inch or less in thickness
 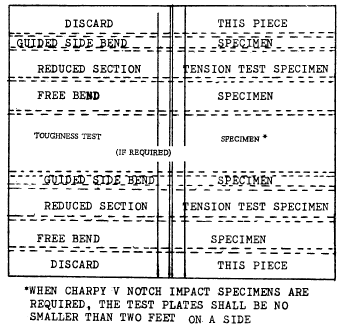 Figure
57.06-4(d)(2) - Workmanship test plates for material three-fourths
inch or less in thickness
(e) In submitting the samples for test the manufacturer shall state the minimum and maximum tensile range of the base metal.
(f) The external appearances of the welds and the amount of weld reinforcement shall conform to the requirements for fabrication, and the maximum reinforcement for the test plates shall not exceed the maximum permitted for construction.
(1) The tension-test specimen of the joint shall be transverse to the welded joint and shall be of the full thickness of the plate after the weld reinforcement has been machined flush. The form and dimensions shall be as shown in Figure 57.06-4(f)(1)(i). When the capacity of the available testing machine does not permit testing a specimen of the full thickness of the welded plate, the specimen may be cut with a thin saw into as many portions of the thickness as necessary, as shown in Figure 57.06-4(f)(1)(ii) each of which shall meet the requirements. The tensile strength of the joint specimen when it breaks in the weld shall not be less than the minimum of the specified tensile range of the plate used. If the specimen breaks in the plate at not less than 95 percent of the minimum specified tensile range of the plate and the weld shows no sign of weakness, the test is considered acceptable.
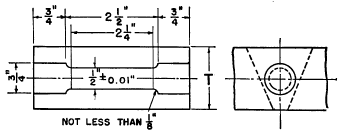
(2) Boiler drums fabricated of plate of thicknesses of five-eighths inch or greater shall have a tension-test specimen of the weld metal machined to form as shown in Figure 57.06-4(f)(2) taken entirely from the deposited metal. The all-weld tension test specimen shall have a tensile strength of not less than the minimum of the range of the plate which is welded and shall have a minimum elongation in 2 inches of not less than 20 percent.
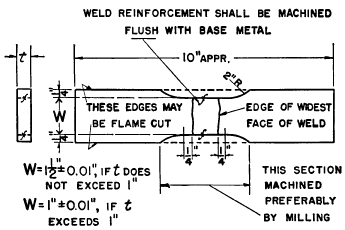 Figure
57.06-4(f)(1)(i) - (PW-53.1) Reduced-section test specimen for
tension test of welded joint
 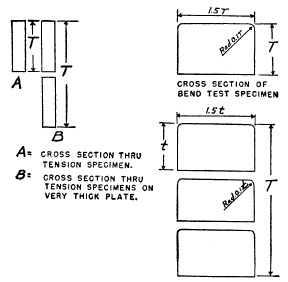 Figure
57.06-4(f)(1)(ii) - (PW-53.3) Cross section of bend-test specimens
from very thick plate
  Figure
57.06-4(f)(2) - (PW-53.3) All weld metal tension-test specimen
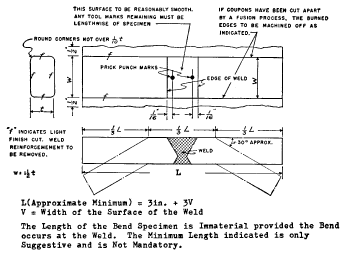
(g) The freebend specimens shall be of the form and dimensions shown in Figure 57.06-4(g). For plates of three-fourths inch or less in thickness one of the specimens shall be bent with the face of the weld in tension. Each freebend specimen shall be bent cold under freebending conditions until the elongation measured within or across approximately the entire weld on the outer surface of the bend is at least 30 percent, except that for Class II and Class II-L pressure vessels, the minimum elongation shall be 20 percent. When the capacity of the available testing machine will not permit testing a full thickness specimen, the specimen may be cut with a thin saw into as many portions of the thickness as necessary as shown in Figure 57.06-4(f)(1)(ii), provided each such piece retains the proportion of 1 1/2 to 1, width to thickness, each of which shall meet the requirements. Cracks at the corners of the specimens or small defects in the convex surface, the greatest dimensions of which do not exceed one-sixteenth inch need not be considered as failures.
 Figure
57.06-4(g) - (PW-53.8) Specimen for free-bend test
(h) The guided-bend specimen shall be bent with the side of the weld in tension, its width shall be equal to the full thickness of the plate and its thickness, after machining, shall be 0.350 inch to 0.380 inch to permit bending in a jig having the contour of the standard jig as shown in Figure QW 466.1, QW 466.2, or QW 466.3 of the ASME Code. The specimen shall withstand being bent cold to the full capacity of the jig without developing any crack exceeding one-eighth inch in any direction. Where the plate thickness exceeds two inches, the specimen shall be cut in two so that each portion does not exceed 2 inches in width. Each such portion shall be tested and shall meet the requirements.
(i) One retest shall be made for each of the original specimens which fails to meet the requirements. Should the retests fail to meet the requirements, the welds which they represent shall be chipped out, rewelded and new test plates provided.
[CGFR 68-82, 33 FR 18872, Dec. 18, 1968, as amended by CGFR 69-127R, 35 FR 9980, June 17, 1970; CGD 74-102, 40 FR 27461, June 30, 1975; CGD 80-004, 45 FR 10796, Feb. 19, 1980; CGD 95-012, 60 FR 48050, Sept. 18, 1995]