Title 7
SECTION 1755.403
1755.403 Copper cable telecommunications plant measurements.
§ 1755.403 Copper cable telecommunications plant measurements.(a) Shield or shield/armor continuity. (1) Tests and measurements shall be made to ensure that cable shields or shield/armors are electrically continuous. There are two areas of concern. The first is shield or shield/armor bonding within a pedestal or splice and the second is shield or shield/armor continuity between pedestals or splices.
(2) Measurement techniques outlined here for verification of shield or shield/armor continuity are applicable to buried cable plant. Measurements of shield continuity between splices in aerial cable plant should be made prior to completion of splicing. Conclusive results cannot be obtained on aerial plant after all bonds have been completed to the supporting strand, multigrounded neutral, etc.
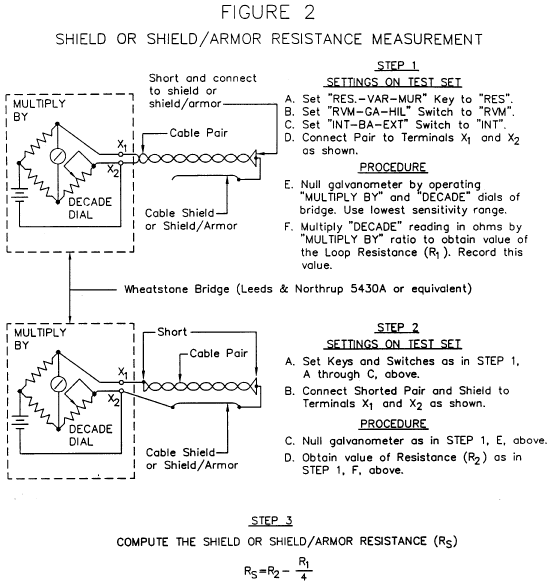
(3) Method of measurement. (i) The shield or shield/armor resistance measurements shall be made between pedestals or splices using either a Wheatstone bridge or a volt-ohm meter. For loaded plant, measurements shall be made on cable lengths that do not exceed one load section. For nonloaded plant, measurements shall be made on cable lengths that do not exceed 5,000 feet (ft) (1,524 meters (m)). All bonding wires shall be removed from the bonding lugs at the far end of the cable section to be measured. The step-by-step measurement procedure shall be as shown in Figure 2.
(ii) Cable shield or shield/armor continuity within pedestals or splices shall be measured with a cable shield splice continuity test set. The step-by-step measurement procedure outlined in the manufacturer's operating instructions for the specific test equipment being used shall be followed.
(4) Test equipment. (i) The test equipment for measuring cable shield or shield/armor resistance between pedestals or splices is shown in Figure 2 as follows:
(ii) A cable shield splice continuity tester shall be used to measure shield or shield/armor continuity within pedestals or splices.
(5) Applicable results. (i) The shield or shield/armor resistance per 1000 ft and per kilometer (km) for cable diameters and types of shielding materials are given in Table 1 (English Units) and Table 2 (Metric Units), respectively as follows:
Table 1 - Shield Resistance @ 68 °F (20 °C) Cable Diameters Versus Shield Types
[English Units]
| Outside diameter inches (in.) | Nominal resistance ohm/1000 ft. | |||||
|---|---|---|---|---|---|---|
| A | B | C | D | E | F | |
| 0.40-0.49 | 0.77 | 1.54 | 1.65 | 1.96 | 2.30 | 5.51 |
| 0.50-0.59 | 0.64 | 1.28 | 1.37 | 1.63 | 1.91 | 4.58 |
| 0.60-0.69 | 0.51 | 1.03 | 1.10 | 1.31 | 1.53 | 3.67 |
| 0.70-0.79 | 0.44 | 0.88 | 0.94 | 1.31 | 3.14 | |
| 0.80-0.89 | 0.38 | 0.77 | 0.82 | 1.14 | 2.74 | |
| 0.90-0.99 | 0.35 | 0.69 | 0.74 | 1.03 | 2.47 | |
| 1.00-1.09 | 0.31 | 0.62 | 0.66 | 0.92 | 2.20 | |
| 1.10-1.19 | 0.28 | 0.56 | 0.60 | 0.84 | 2.00 | |
| 1.20-1.29 | 0.26 | 0.51 | 0.55 | 0.77 | 1.84 | |
| 1.30-1.39 | 0.24 | 0.48 | 0.51 | 0.71 | 1.70 | |
| 1.40-1.49 | 0.22 | 0.44 | 0.47 | 0.65 | 1.57 | |
| 1.50-1.59 | 0.21 | 0.41 | 0.44 | 0.61 | 1.47 | |
| 1.60-1.69 | 0.19 | 0.38 | 0.41 | 0.57 | 1.37 | |
| 1.70-1.79 | 0.18 | 0.37 | 0.39 | 0.54 | 1.30 | |
| 1.80-1.89 | 0.17 | 0.35 | 0.37 | 0.51 | 1.24 | |
| 1.90-1.99 | 0.16 | 0.33 | 0.35 | 0.49 | 1.17 | |
| 2.00-2.09 | 0.15 | 0.31 | 0.33 | 0.46 | 1.10 | |
| 2.10-2.19 | 0.15 | 0.29 | 0.31 | 0.43 | 1.03 | |
| 2.20-2.29 | 0.14 | 0.28 | 0.30 | 0.42 | 1.00 | |
| 2.30-2.39 | 0.14 | 0.27 | 0.29 | 0.40 | 0.97 | |
| 2.40-2.49 | 0.13 | 0.25 | 0.27 | 0.38 | 0.90 | |
| 2.50-2.59 | 0.12 | 0.24 | 0.26 | 0.36 | 0.87 | |
| 2.60-2.69 | 0.12 | 0.23 | 0.25 | 0.35 | 0.83 | |
| 2.70-2.79 | 0.11 | 0.22 | 0.24 | 0.33 | 0.80 | |
| 2.80-2.89 | 0.11 | 0.22 | 0.24 | 0.33 | 0.80 | |
| 2.90-2.99 | 0.11 | 0.22 | 0.23 | 0.32 | 0.77 | |
| 3.00-3.09 | 0.10 | 0.21 | 0.22 | 0.31 | 0.73 | |
| 3.10-3.19 | 0.10 | 0.20 | 0.21 | 0.29 | 0.70 | |
| 3.20-3.29 | 0.10 | 0.20 | 0.21 | 0.29 | 0.70 | |
| 3.30-3.39 | 0.09 | 0.19 | 0.20 | 0.28 | 0.67 | |
| 3.40-3.49 | 0.09 | 0.18 | 0.19 | 0.26 | 0.63 | |
| 3.50-3.59 | 0.09 | 0.18 | 0.19 | 0.26 | 0.63 | |
| 3.60-3.69 | 0.08 | 0.17 | 0.18 | 0.25 | 0.60 | |
| 3.70-3.79 | 0.08 | 0.17 | 0.18 | 0.25 | 0.60 | |
| 3.80-3.89 | 0.08 | 0.16 | 0.17 | 0.24 | 0.57 | |
| 3.90-3.99 | 0.08 | 0.16 | 0.17 | 0.24 | 0.57 | |
| 4.00-4.99 | 0.07 | 0.15 | 0.16 | 0.22 | 0.53 | |
Where: Column A-10 mil Copper shield.
Column B - 5 mil Copper shield.
Column C - 8 mil Coated Aluminum and 8 mil Coated Aluminum/6 mil Coated Steel shields.
Column D - 7 mil Alloy 194 shield.
Column E - 6 mil Alloy 194 and 6 mil Copper Clad Stainless Steel shields.
Column F - 5 mil Copper Clad Stainless Steel and 5 mil Copper Clad Alloy Steel shields.
Table 2 - Shield Resistance @ 68 °F (20 °C) Cable Diameters Versus Shield Types
[Metric Units]
| Outside diameter millimeters (mm) | Nominal Resistance ohm/km | |||||
|---|---|---|---|---|---|---|
| A | B | C | D | E | F | |
| 10.2 - 12.5 | 2.53 | 5.05 | 5.41 | 6.43 | 7.55 | 18.08 |
| 12.7 - 15.0 | 2.10 | 4.20 | 4.49 | 5.35 | 6.27 | 15.03 |
| 15.2 - 17.5 | 1.67 | 3.38 | 3.61 | 4.30 | 5.02 | 12.04 |
| 17.8 - 20.1 | 1.44 | 2.89 | 3.08 | 4.30 | 10.30 | |
| 20.3 - 22.6 | 1.25 | 2.53 | 2.69 | 3.74 | 8.99 | |
| 22.9 - 25.1 | 1.15 | 2.26 | 2.43 | 3.38 | 8.10 | |
| 25.4 - 27.7 | 1.02 | 2.03 | 2.16 | 3.02 | 7.22 | |
| 27.9 - 30.2 | 0.92 | 1.84 | 1.97 | 2.76 | 6.56 | |
| 30.5 - 32.8 | 0.85 | 1.67 | 1.80 | 2.53 | 6.04 | |
| 33.0 - 35.3 | 0.79 | 1.57 | 1.67 | 2.33 | 5.58 | |
| 35.6 - 37.8 | 0.72 | 1.44 | 1.54 | 2.13 | 5.15 | |
| 38.1 - 40.4 | 0.69 | 1.34 | 1.44 | 2.00 | 4.82 | |
| 40.6 - 42.9 | 0.62 | 1.25 | 1.34 | 1.87 | 4.49 | |
| 43.2 - 45.5 | 0.59 | 1.21 | 1.28 | 1.77 | 4.26 | |
| 45.7 - 48.0 | 0.56 | 1.15 | 1.21 | 1.67 | 4.07 | |
| 48.3 - 50.5 | 0.52 | 1.08 | 1.15 | 1.61 | 3.84 | |
| 50.8 - 53.1 | 0.49 | 1.02 | 1.08 | 1.51 | 3.61 | |
| 53.3 - 55.6 | 0.49 | 0.95 | 1.02 | 1.41 | 3.38 | |
| 55.9 - 58.2 | 0.46 | 0.92 | 0.98 | 1.38 | 3.28 | |
| 58.4 - 60.7 | 0.46 | 0.89 | 0.95 | 1.31 | 3.18 | |
| 61.0 - 63.2 | 0.43 | 0.82 | 0.89 | 1.25 | 2.95 | |
| 63.5 - 65.8 | 0.39 | 0.79 | 0.85 | 1.18 | 2.85 | |
| 66.0 - 68.3 | 0.39 | 0.75 | 0.82 | 1.15 | 2.72 | |
| 68.6 - 70.9 | 0.36 | 0.72 | 0.79 | 1.08 | 2.62 | |
| 71.1 - 73.4 | 0.36 | 0.72 | 0.79 | 1.08 | 2.62 | |
| 73.7 - 75.9 | 0.36 | 0.72 | 0.75 | 1.05 | 2.53 | |
| 76.2 - 78.5 | 0.33 | 0.69 | 0.72 | 1.02 | 2.39 | |
| 78.7 - 81.0 | 0.33 | 0.66 | 0.69 | 0.95 | 2.30 | |
| 81.3 - 83.6 | 0.33 | 0.66 | 0.69 | 0.95 | 2.30 | |
| 83.6 - 86.1 | 0.29 | 0.62 | 0.66 | 0.92 | 2.20 | |
| 86.4 - 88.6 | 0.29 | 0.59 | 0.62 | 0.85 | 2.07 | |
| 88.9 - 91.2 | 0.29 | 0.59 | 0.62 | 0.85 | 2.07 | |
| 91.4 - 93.7 | 0.26 | 0.56 | 0.59 | 0.82 | 1.97 | |
| 94.0 - 96.3 | 0.26 | 0.56 | 0.59 | 0.82 | 1.97 | |
| 96.5 - 98.8 | 0.26 | 0.52 | 0.56 | 0.79 | 1.87 | |
| 99.1 - 101.3 | 0.26 | 0.52 | 0.56 | 0.79 | 1.87 | |
| 101.6 - 103.9 | 0.23 | 0.49 | 0.52 | 0.72 | 1.74 | |
Where: Column A - 10 mil Copper shield.
Column B - 5 mil Copper shield.
Column C - 8 mil Coated Aluminum and 8 mil Coated Aluminum/6 mil Coated Steel shields.
Column D - 7 mil Alloy 194 shield.
Column E - 6 mil Alloy 194 and 6 mil Copper Clad Stainless Steel shields.
Column F - 5 mil Copper Clad Stainless Steel and 5 mil Copper Clad Alloy Steel shields.
(ii) All values of shield and shield/armor resistance provided in Tables 1 and 2 in (a)(5)(i) of this section are considered approximations. If the measured value corrected to 68 °F (20 °C) is within #30 percent (%) of the value shown in Table 1 or 2, the shield and shield/armor shall be assumed to be continuous.
(iii) To correct the measured shield resistance to the reference temperature of 68 °F (20 °C) use the following formulae:
R68 = Rt/[1 + A(t − 68)] for English Units R20 = Rt/[1 + A(t − 20)] for Metric Units Where: R68 = Shield resistance corrected to 68 °F in ohms. R20 = Shield resistance corrected to 20 °C in ohms. Rt = Shield resistance at measurement temperature in ohms. A = Temperature coefficient of the shield tape. t = Measurement temperature in °F or (°C).(iv) The temperature coefficients (A) for the shield tapes to be used in the formulae referenced in paragraph (a)(5)(iii) of this section are as follows:
(A) 5 and 10 mil copper = 0.0021 for English units and 0.0039 for Metric units;
(B) 8 mil coated aluminum and 8 mil coated aluminum/6 mil coated steel = 0.0022 for English units and 0.0040 for Metric units;
(C) 5 mil copper clad stainless steel and 5 mil copper clad alloy steel = 0.0024 for English units and 0.0044 for Metric units;
(D) 6 mil copper clad stainless steel = 0.0019 for English units and 0.0035 for Metric units; and
(E) 6 and 7 mil alloy 194 = 0.0013 for English units and 0.0024 for Metric units.
(v) When utilizing shield continuity testers to measure shield and shield/armor continuity within pedestals or splices, refer to the manufacturer's published information covering the specific test equipment to be used and for anticipated results.
(6) Data record. Measurement data from shield continuity tests shall be recorded together with anticipated Table 1 or 2 values (see paragraph (a)(5)(i) of this section) in an appropriate format to permit comparison. The recorded data shall include specific location, cable size, cable type, type of shield or shield/armor, if known, etc.
(7) Probable causes for nonconformance. Among probable causes for nonconformance are broken or damaged shields or shield/armors, bad bonding harnesses, poorly connected bonding clamps, loose bonding lugs, etc.
(b) Conductor continuity. After placement of all cable and wire plant has been completed and joined together in continuous lengths, tests shall be made to ascertain that all pairs are free from grounds, shorts, crosses, and opens, except for those pairs indicated as being defective by the cable manufacturer. The tests for grounds, shorts, crosses, and opens are not separate tests, but are inherent in other acceptance tests discussed in this section. The test for grounds, shorts, and crosses is inherent when conductor insulation resistance measurements are conducted per paragraph (c) of this section, while tests for opens are inherent when tests are conducted for loop resistance, insertion loss, noise, or return loss measurements, per paragraphs (d), (e), or (f) of this section. The borrower shall make certain that all defective pairs are corrected, except those noted as defective by the cable manufacturer in accordance with the marking provisions of the applicable cable and wire specifications. All defective pairs that are not corrected shall be reported in writing with details of the corrective measures attempted.
(c) Dc insulation resistance (IR) measurement. (1) IR measurements shall be made on completed lengths of insulated cable and wire plant.
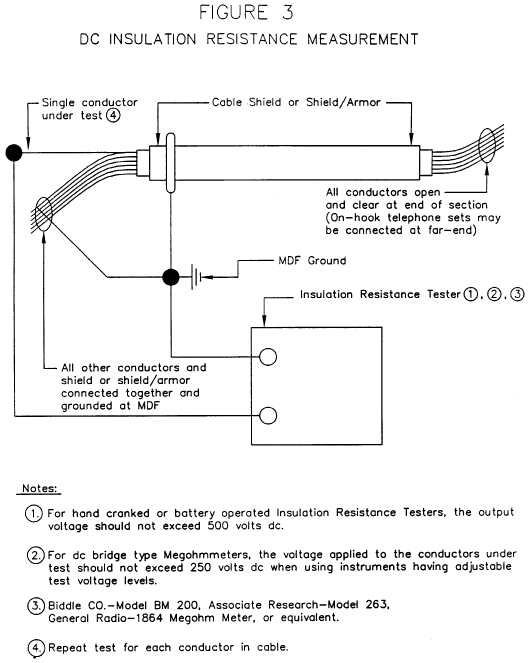
(2) Method of measurement. (i) The IR measurement shall be made between each conductor and all other conductors, sheath, shield and/or shield/armor, and/or support wire electrically connected together and to the main distributing frame (MDF) ground. The measurement shall be made from the central office with the entire length of the cable under test and, where used with all protectors and load coils connected. For COs containing solid state arresters, the solid state arresters shall be removed before making the IR measurements. Field mounted voice frequency repeaters, where used, may be left connected for the IR test but all carrier frequency equipment, including carrier repeaters and terminals, shall be disconnected. Pairs used to feed power remote from the CO shall have the power disconnected and the tip and ring conductors shall be opened before making IR tests. All conductors shall be opened at the far end of the cable being measured.
(ii) IR tests are normally made from the MDF with all CO equipment disconnected at the MDF, but this test may be made on new cables at field locations before they are spliced to existing cables. The method of measurement shall be as shown in Figure 3 as follows:
(iii) If the IR of the conductor cannot be measured because of breakdown of lightning arresters by the test voltage, the arrester units shall be removed and the conductor IR retested. If the IR then meets the minimum requirements, the conductor will be considered satisfactory. Immediately following the IR tests, all arrester units which have been removed shall be reinstalled.
(3) Test equipment. (i) IR measurements shall be made with either an insulation resistance test set or a direct current (dc) bridge type megohmmeter.
(ii) The IR test set shall have an output voltage not to exceed 500 volts dc and shall be of the hand cranked or battery operated type.
(iii) The dc bridge type megohmmeter, which may be alternating current (ac) powered, shall have scales and multiplier which make it possible to accurately read IR from 1 megohm to 1 gigohm. The voltage applied to the conductors under test shall not exceed “250 volts dc” when using an instrument having adjustable test voltage levels. This will help to prevent breakdown of lightning arresters.
(4) Applicable results. (i) For all new insulated cable or wire facilities, the expected IR levels are normally greater than 1,000 to 2,000 megohm-mile (1,609 to 3,218 megohm-km). A value of 500 megohm-mile (805 megohm-km) at 68 °F (20 °C) shall be the minimum acceptable value of IR. IR varies inversely with the length and the temperature.
(ii) The megohm-mile (megohm-km) value for a conductor may be computed by multiplying the actual scale reading in megohms on the test set by the length in miles (km) of the conductor under test.
(iii) The objective insulation resistance may be determined by dividing 500 by the length in miles (805 by the length in km) of the cable or wire conductor being tested. The resulting value shall be the minimum acceptable meter scale reading in megohms.
(iv) Due to the differences between various insulating materials and filling compounds used in manufacturing cable or wire, it is impractical to provide simple factors to predict the magnitude of variation in insulation resistance due to temperature. The variation can, however, be substantial for wide excursions in temperature from the ambient temperature of 68 °F (20 °C).
(v) Borrowers should be certain that tip and ring IR measurements of each pair are approximately the same. Borrowers should also be certain that IR measurements are similar for cable or wire sections of similar length and cable or wire type. If some pairs measure significantly lower, borrowers should attempt to improve these pairs in accordance with cable manufacturer's recommendations.
Note:Only the megohm-mile (megohm-km) requirement shall be cause for rejection, not individual measurement differences.
(5) Data record. The measurement data shall be recorded. Suggested formats similar to Format I, Outside Plant Acceptance Tests - Subscriber Loops, or Format II, Outside Plant Acceptance Tests - Trunk Circuits, in § 1755.407 or formats specified in the applicable construction contract may be used.
(6) Probable causes for nonconformance. (i) When an IR measurement is below 500 megohm-mile (805 megohm-km), the cable or wire temperature at the time of testing must then be taken into consideration. If this temperature is well above 68 °F (20 °C), the measurement shall be disregarded and the cable or wire shall be remeasured at a time when the temperature is approximately 68 °F (20 °C). If the result is then 500 megohm-mile (805 megohm-km) or greater, the cable or wire shall be considered satisfactory.
(ii) Should the cable or wire fail to meet the 500 megohm-mile (805 megohm-km) requirement when the temperature is known to be approximately 68 °F (20 °C) there is not yet justification for rejection of the cable or wire. Protectors, lightning arresters, etc., may be a source of low insulation resistance. These devices shall be removed from the cable or wire and the cable or wire IR measurement shall be repeated. If the result is acceptable, the cable or wire shall be considered acceptable. The removed devices which caused the low insulation resistance value shall be identified and replaced, if found defective.
(iii) When the cable or wire alone is still found to be below the 500 megohm-mile (805 megohm-km) requirement after completing the steps in paragraph (c)(6)(i) and/or paragraph (c)(6)(ii) of this section, the test shall be repeated to measure the cable or wire in sections to isolate the piece(s) of cable or wire responsible. The cable or wire section(s) that is found to be below the 500 megohm-mile (805 megohm-km) requirement shall be either repaired in accordance with the cable or wire manufacturer's recommended procedure or shall be replaced as directed by the borrower.
(d) Dc loop resistance and dc resistance unbalance measurement. (1) When specified by the borrower, dc loop resistance and dc resistance unbalance measurements shall be made on all cable pairs used as trunk circuits. The dc loop resistance and dc resistance unbalance measurements shall be made between CO locations. Measurements shall include all components of the cable path.
(2) Dc loop resistance and dc resistance unbalance measurements shall be made on all cable pairs used as subscriber loop circuits when:
(i) Specified by the borrower;
(ii) A large number of long loops terminate at one location (similar to trunk circuits); or
(iii) Circuit balance is less than 60 dB when computed from noise measurements as described in paragraph (e) of this section.
(3) Dc resistance unbalance is controlled to the maximum possible degree by the cable specification. Allowable random unbalance is specified between tip and ring conductors within each reel. Further random patterns should occur when the cable conductor size changes. Cable meeting the unbalance requirements of the cable specification may under some conditions result in unacceptable noise levels as discussed in paragraph (d)(6)(iii) of this section.
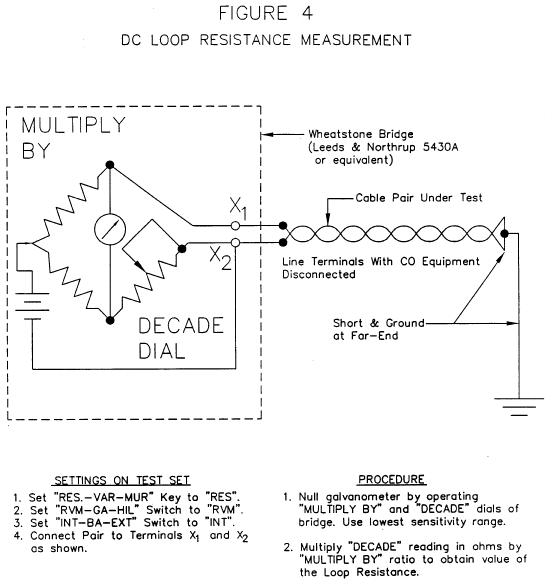
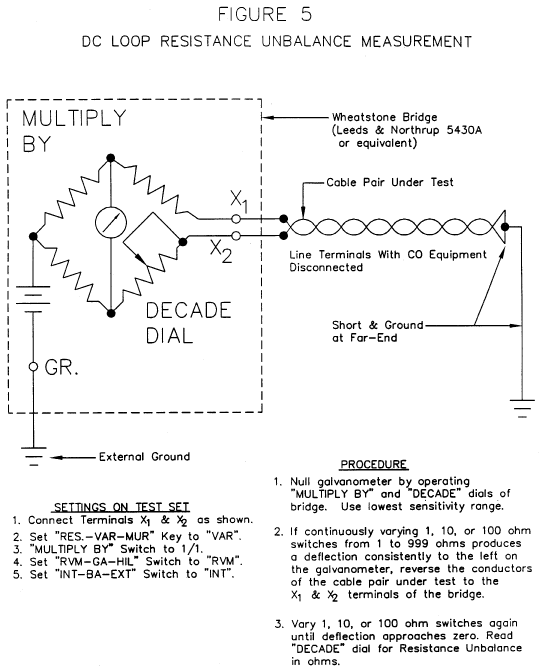
(4) Method of measurement. The method of measurement shall be as detailed in Figures 4 and 5.
(5) Test equipment. The test equipment is shown in Figures 4 and 5 as follows:
(6) Applicable results. (i) The measured dc loop resistance shall be within ±5% of the calculated dc loop resistance when corrected for temperature.
(ii) The calculated dc loop resistance is computed as follows:
(A) Multiply the length of each different gauge by the applicable resistance per unit length as shown in Table 3 as follows:
Table 3 - DC Loop Resistance @ 68 °F (20 °C)
| American wire gauge (AWG) | Loop resistance | |
|---|---|---|
| ohms/1000 ft | ohms/km | |
| 19 | 16.1 | 52.8 |
| 22 | 32.4 | 106.3 |
| 24 | 51.9 | 170.3 |
| 26 | 83.3 | 273.3 |
(B) Add the individual resistances for each gauge to give the total calculated dc loop resistance at a temperature of 68 °F (20 °C).
(C) Correct the total calculated dc loop resistance at the temperature of 68 °F (20 °C) to the measurement temperature by the following formulae:
Rt = R68 × [1 + 0.0022 × t − 68)] for English Units Rt = R20 × [1 + 0.0040 × (t − 20)] for Metric Units Where: Rt = Loop resistance at the measurement temperature in ohms. R68 = Loop resistance at a temperature of 68 °F in ohms. R20 = Loop resistance at a temperature of 20 °C in ohms. t = Measurement temperature in °F or (°C).(D) Compare the calculated dc loop resistance at the measurement temperature to the measured dc loop resistance to determine compliance with the requirement specified in paragraph (d)(6)(i) of this section.
(iii) Resistance varies directly with temperature change. For copper conductor cables, the dc resistance changes by ±1% for every ±5 °F (2.8 °C) change in temperature from 68 °F (20 °C).
(iv) The dc resistance unbalance between the individual conductors of a pair shall not exceed that value which will result in a circuit balance of less than 60 dB when computed from noise measurements as described in paragraph (e) of this section. It is impractical to establish a precise limit for overall circuit dc resistance unbalance due to the factors controlling its contribution to circuit noise. These factors include location of the resistance unbalance in relation to a low impedance path to ground (close to the central office) and the magnitude of unbalance in short lengths of cable making up the total circuit length. The objective is to obtain the minimum unbalance throughout the entire circuit when it is ascertained through noise measurements that dc resistance unbalance may be contributing to poor cable balance.
(v) Pairs with poor noise balance may be improved by reversing tip and ring conductors of pairs at cable splices. Where dc resistance unbalances are systematic over the total trunk circuit or loop circuit length, tip and ring reversals may be made at frequent intervals. Where the unbalances are concentrated in a shorter section of cable, only one tip and ring reversal should be required. Concentrated dc resistance unbalance produces maximum circuit noise when located adjacent to the central office. Concentrated dc resistance unbalance will contribute to overall circuit noise at a point approximately two-thirds ( 2/3) of the distance to the subscriber. All deliberate tip and ring reversals shall be tagged and identified to prevent plant personnel from removing the reversals when resplicing these connections in the future. The number of tip and ring reversals shall be held to a minimum.
(vi) A systematic dc resistance unbalance can sometimes be accompanied by other cable parameters that are marginal. Among these are pair-to-pair capacitance unbalance, capacitance unbalance-to-ground, and 150 kilohertz (kHz) crosstalk loss. Engineering judgment has to be applied in each case. Rejection of cable for excessive dc resistance unbalance shall only apply to a single reel length, or shorter.
(7) Data record. The measurement data for dc loop resistance and dc resistance unbalance shall be recorded. Suggested formats similar to Format I for subscriber loops and Format II for trunk circuits in § 1755.407 or formats specified in the applicable construction contract may be used.
(8) Probable causes for nonconformance. Dc loop resistance and dc resistance unbalance are usually the result of the resistance of individual conductors used in the manufacture of the cable. Resistance unbalance can be worsened by defective splicing of the conductors (splicing connectors, improper crimping tool, etc.).
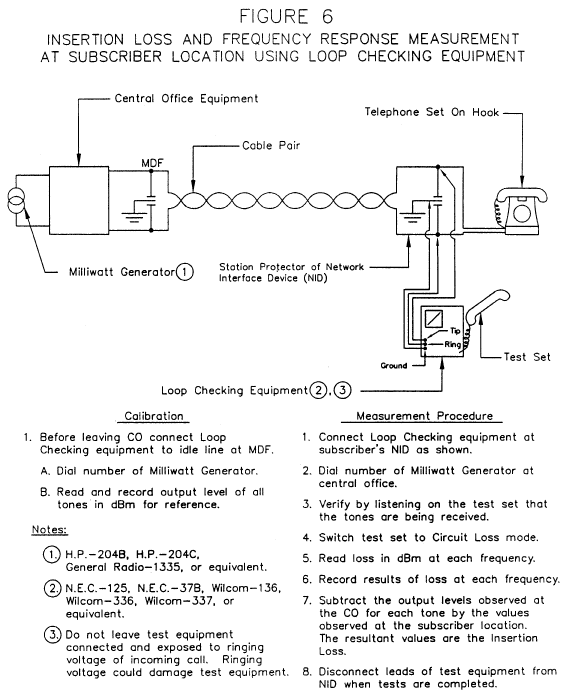
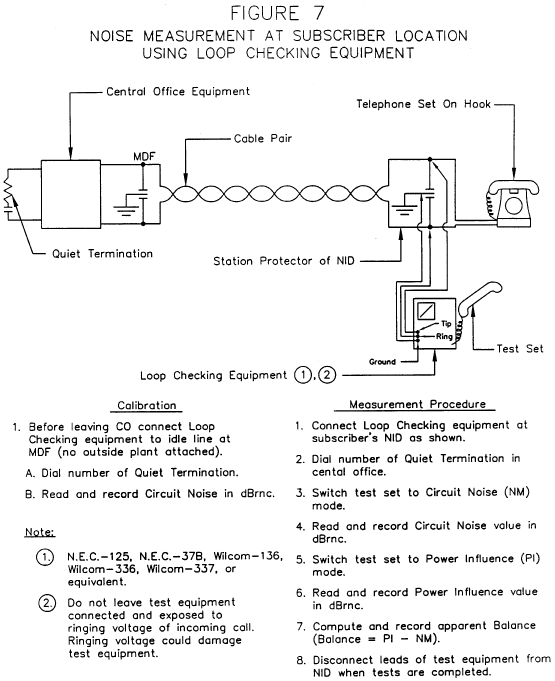
(e) Subscriber loop measurement (loop checking). (1) When specified by the borrower, insertion loss and noise measurements shall be performed on subscriber loops after connection of a line circuit to the loop by the one person method using loop checking equipment from the customer access location. For this method, the central office should be equipped with a 900 ohm plus two microfarad quiet termination and a milliwatt generator having the required test frequencies; or a portable milliwatt generator having the desired frequencies may be used, especially, where several small offices are involved.
(2) At a minimum, insertion loss and frequency response of subscriber loop plant shall be measured at 1,000, 1,700, 2,300, and 2,800 Hertz (Hz). When additional testing frequencies are desired, the additional frequencies shall be specified in the applicable construction contract.
(3) Measurements of insertion loss and noise shall be made on five percent or more of the pairs. A minimum of five pairs shall be tested on each route. Pairs shall be selected on a random basis with greater consideration in the selection given to the longer loops. Consideration shall be given to measuring a large percentage, up to 100 percent, of all loops.
(4) Method of measurement - (i) Insertion loss. The step-by-step measurement procedure shall be as shown in Figure 6. The output level of the milliwatt generator tones shall be determined prior to leaving the CO. This shall be accomplished by dialing the milliwatt generator number from a spare line at the MDF and measuring with the same equipment to be used in the tests at customer access locations. The output levels shall be recorded for reference later. Insertion loss measurements shall be made across the tip and ring terminals of the pair under test. Figure 6 is as follows:
(ii) Noise. The step-by-step measurement procedure shall be as shown in Figure 7. Prior to leaving the CO for testing, dial the 900 ohm plus two microfarad quiet termination from a spare pair and measure the termination to determine that it actually is quiet. Circuit noise (noise-metallic) shall be measured at the customer access location across the tip and ring terminals of the pair under test. Power influence (direct reading with loop checking equipment) shall be measured at the customer access location from tip and ring conductors-to-ground (this connection is completed via the test unit). The power influence measurement includes the entire talking connection from the quiet termination to the customer. (That is, the power influence measurement includes all the CO equipment which normally makes up the connection.) Figure 7 is as follows:
(5) Test equipment. (i) Loop checking equipment which is available from several manufacturers may be used for these measurements. The equipment should have the capability of measuring loop current, insertion loss, circuit noise (NM) and power influence (PI). The test equipment manufacturer's operating instructions shall be followed.
(ii) There should be no measurable transmission loss when testing through loop extenders.
(6) Applicable results - (i) Insertion loss. (A) For D66 loaded cables (a specific loading scheme using a 66 millihenry inductor spaced nominally at 4,500 ft [1,371 m] intervals) measured at a point one-half section length beyond the last load point, the measured nonrepeated insertion loss shall be within ±10% at 1000, 1700, 2300, and 2800 Hz, ±15% at 3400 Hz and ±20% at 4000 Hz of the calculated insertion loss at the same frequencies and temperature.
(B) For H88 loaded cables (a specific loading scheme using an 88 millihenry inductor spaced nominally at 6,000 ft [1,829 m] intervals) measured at a point one-half section length beyond the last load point, the measured nonrepeatered insertion loss shall be within ±10% at 1000, 1700, and 2300 Hz, ±15% at 2800 Hz, and ±20% at 3400 Hz of the calculated insertion loss at the same frequencies and temperature.
(C) For nonloaded cables, the measured insertion loss shall be within ±10% at 1000, 1700, 2300, and 2800 Hz, ±15% at 3400 Hz and ±20% at 4000 Hz of the calculated insertion loss at the same frequencies and temperature.
(D) For loaded cables, the calculated loss at each desired frequency shall be computed as follows:
(1) Multiply the length in miles (km) of each different gauge in the loaded portion of the loop (between the office and a point one-half load section beyond the furthest load point) by the applicable decibel (dB)/mile (dB/km) value shown in Table 4 or 5. This loss represents the total loss for each gauge in the loaded portion of the loop;
(2) Multiply the length in miles (km) of each different gauge in the end section or nonloaded portion of the cable (beyond a point one-half load section beyond the furthest load point) by the applicable dB/mile (dB/km) value shown in Table 6. This loss represents the total loss for each gauge in the nonloaded portion of the loop; and
(3) The total calculated insertion loss is computed by adding the individual losses determined in paragraphs (e)(6)(i)(D)(1) and (e)(6)(i)(D)(2) of this section.
(E) For nonloaded cables, the calculated loss at each desired frequency shall be computed by multiplying the length in miles (km) of each different gauge by the applicable dB/mile (dB/km) value shown in Table 6 and then adding the individual losses for each gauge to determine the total calculated insertion loss for the nonloaded loop.
(F) The attenuation information in Tables 4, 5, and 6 are based on a cable temperature of 68 °F (20 °C). Insertion loss varies directly with temperature. To convert measured losses for loaded cables to a different temperature, use the following value for copper conductors: For each ±5 °F (±2.8 °C) change in the temperature from 68 °F (20 °C), change the insertion loss at any frequency by ±1%. To convert measured losses for nonloaded cables to a different temperature, use the following value for copper conductors: For each ±10 °F (±5.6 °C) change in the temperature from 68 °F (20 °C), change the insertion loss at any frequency by ±1%. Tables 4, 5, and 6 are as follows:
Table 4 - Frequency Attenuation @ 68 °F (20 °C) D66 Loaded Exchange Cables 83 nanofarad (nF)/mile (52 nF/km) (See Note)
| Frequency (Hz) | Attenuation dB/mile (dB/km) AWG | |||
|---|---|---|---|---|
| 19 | 22 | 24 | 26 | |
| 200 | 0.41 (0.26) | 0.67 (0.42) | 0.90 (0.56) | 1.21 (0.75) |
| 400 | 0.43 (0.26) | 0.77 (0.48) | 1.09 (0.68) | 1.53 (0.95) |
| 600 | 0.44 (0.27) | 0.80 (0.49) | 1.17 (0.73) | 1.70 (1.06) |
| 800 | 0.44 (0.27) | 0.81 (0.50) | 1.21 (0.75) | 1.80 (1.12) |
| 1000 | 0.44 (0.27) | 0.82 (0.51) | 1.23 (0.76) | 1.86 (1.15) |
| 1200 | 0.45 (0.28) | 0.83 (0.52) | 1.24 (0.77) | 1.91 (1.19) |
| 1400 | 0.45 (0.28) | 0.83 (0.52) | 1.26 (0.78) | 1.94 (1.20) |
| 1600 | 0.45 (0.28) | 0.84 (0.52) | 1.26 (0.78) | 1.96 (1.22) |
| 1800 | 0.45 (0.28) | 0.84 (0.52) | 1.27 (0.78) | 1.98 (1.23) |
| 2000 | 0.46 (0.29) | 0.85 (0.53) | 1.28 (0.79) | 1.99 (1.24) |
| 2200 | 0.46 (0.29) | 0.85 (0.53) | 1.29 (0.80) | 2.01 (1.25) |
| 2400 | 0.47 (0.29) | 0.86 (0.53) | 1.30 (0.81) | 2.02 (1.26) |
| 2600 | 0.47 (0.29) | 0.87 (0.54) | 1.31 (0.81) | 2.04 (1.27) |
| 2800 | 0.48 (0.30) | 0.88 (0.55) | 1.32 (0.82) | 2.07 (1.29) |
| 3000 | 0.49 (0.30) | 0.89 (0.55) | 1.34 (0.83) | 2.10 (1.30) |
| 3200 | 0.50 (0.31) | 0.91 (0.57) | 1.36 (0.84) | 2.13 (1.32) |
| 3400 | 0.52 (0.32) | 0.93 (0.58) | 1.40 (0.87) | 2.19 (1.36) |
| 3600 | 0.54 (0.34) | 0.97 (0.60) | 1.45 (0.90) | 2.26 (1.40) |
| 3800 | 0.57 (0.35) | 1.02 (0.63) | 1.52 (0.94) | 2.36 (1.47) |
| 4000 | 0.62 (0.38) | 1.10 (0.68) | 1.63 (1.01) | 2.53 (1.57) |
Note: Between end-section lengths of 2,250 ft (686 m) for D66 loading.
Table 5 - Frequency Attenuation @ 68 °F (20 °C) H88 Loaded Exchange Cables 83 nF/ mile (52 nF/km) (See Note)
| Frequency (Hz) | Attenuation dB/mile (dB/km) AWG | |||
|---|---|---|---|---|
| 19 | 22 | 24 | 26 | |
| 200 | 0.40 (0.25) | 0.66 (0.41) | 0.90 (0.56) | 1.20 (0.75) |
| 400 | 0.42 (0.26) | 0.76 (0.47) | 1.08 (0.67) | 1.53 (0.95) |
| 600 | 0.43 (0.27) | 0.79 (0.49) | 1.16 (0.72) | 1.70 (1.06) |
| 800 | 0.43 (0.27) | 0.80 (0.50) | 1.20 (0.75) | 1.80 (1.12) |
| 1000 | 0.43 (0.27) | 0.81 (0.50) | 1.23 (0.76) | 1.86 (1.15) |
| 1200 | 0.44 (0.27) | 0.82 (0.51) | 1.24 (0.77) | 1.91 (1.19) |
| 1400 | 0.44 (0.28) | 0.82 (0.51) | 1.25 (0.78) | 1.94 (1.20) |
| 1600 | 0.44 (0.27) | 0.83 (0.52) | 1.26 (0.78) | 1.97 (1.22) |
| 1800 | 0.45 (0.28) | 0.84 (0.52) | 1.28 (0.79) | 1.99 (1.24) |
| 2000 | 0.46 (0.29) | 0.85 (0.53) | 1.29 (0.80) | 2.02 (1.26) |
| 2200 | 0.47 (0.29) | 0.86 (0.53) | 1.31 (0.81) | 2.06 (1.28) |
| 2400 | 0.48 (0.30) | 0.89 (0.55) | 1.34 (0.83) | 2.10 (1.30) |
| 2600 | 0.50 (0.31) | 0.92 (0.57) | 1.39 (0.86) | 2.18 (1.35) |
| 2800 | 0.53 (0.33) | 0.97 (0.60) | 1.47 (0.91) | 2.29 (1.42) |
| 3000 | 0.59 (0.37) | 1.07 (0.66) | 1.60 (0.99) | 2.48 (1.54) |
| 3200 | 0.71 (0.44) | 1.26 (0.78) | 1.87 (1.16) | 2.86 (1.78) |
| 3400 | 1.14 (0.71) | 1.91 (1.19) | 2.64 (1.64) | 3.71 (2.30) |
| 3600 | 4.07 (2.53) | 4.31 (2.68) | 4.65 (2.90) | 5.30 (3.29) |
| 3800 | 6.49 (4.03) | 6.57 (4.08) | 6.72 (4.18) | 7.06 (4.39) |
| 4000 | 8.22 (5.11) | 8.27 (5.14) | 8.36 (5.19) | 8.58 (5.33) |
Note: Between end-section lengths of 3,000 ft (914 m) for H88 loading.
Table 6 - Frequency Attenuation @ 68 °F (20 °C) Nonloaded Exchange Cables 83 nF/ mile (52 nF/km) AWG
| Frequency (Hz) | Attenuation dB/mile (dB/km) AWG | |||
|---|---|---|---|---|
| 19 | 22 | 24 | 26 | |
| 200 | 0.58 (0.36) | 0.82 (0.51) | 1.03 (0.64) | 1.30 (0.81) |
| 400 | 0.81 (0.51) | 1.15 (0.71) | 1.45 (0.90) | 1.84 (1.14) |
| 600 | 0.98 (0.61) | 1.41 (0.87) | 1.77 (1.10) | 2.26 (1.40) |
| 800 | 1.13 (0.70) | 1.62 (1.01) | 2.04 (1.27) | 2.60 (1.61) |
| 1000 | 1.25 (0.78) | 1.80 (1.12) | 2.28 (1.42) | 2.90 (1.80) |
| 1200 | 1.36 (0.84) | 1.97 (1.22) | 2.50 (1.55) | 3.17 (1.97) |
| 1400 | 1.46 (0.91) | 2.12 (1.32) | 2.69 (1.67) | 3.42 (2.12) |
| 1600 | 1.55 (0.96) | 2.26 (1.40) | 2.87 (1.78) | 3.65 (2.27) |
| 1800 | 1.63 (1.01) | 2.39 (1.48) | 3.04 (1.89) | 3.87 (2.40) |
| 2000 | 1.71 (1.06) | 2.51 (1.56) | 3.20 (1.99) | 4.08 (2.53) |
| 2200 | 1.78 (1.11) | 2.62 (1.63) | 3.35 (2.08) | 4.27 (2.65) |
| 2400 | 1.85 (1.15) | 2.73 (1.70) | 3.49 (2.17) | 4.45 (2.76) |
| 2600 | 1.91 (1.19) | 2.83 (1.76) | 3.62 (2.25) | 4.63 (2.88) |
| 2800 | 1.97 (1.22) | 2.93 (1.82) | 3.75 (2.33) | 4.80 (2.98) |
| 3000 | 2.03 (1.26) | 3.02 (1.88) | 3.88 (2.41) | 4.96 (3.08) |
| 3200 | 2.08 (1.29) | 3.11 (1.93) | 4.00 (2.48) | 5.12 (3.18) |
| 3400 | 2.13 (1.32) | 3.19 (1.98) | 4.11 (2.55) | 5.27 (3.27) |
| 3600 | 2.18 (1.35) | 3.28 (2.04) | 4.22 (2.62) | 5.41 (3.36) |
| 3800 | 2.22 (1.38) | 3.36 (2.09) | 4.33 (2.69) | 5.55 (3.45) |
| 4000 | 2.27 (1.41) | 3.43 (2.13) | 4.43 (2.75) | 5.69 (3.53) |
(G) For loaded subscriber loops, the 1 kHz loss shall be approximately 0.45 dB per 100 ohms of measured dc loop resistance. This loss shall be the measured loss less the net gain of any voice frequency repeaters in the circuit. Testing shall also be conducted to verify that the loss increases gradually as the frequency increases. The loss on H88 loaded loops should be down only slightly at 2.8 kHz but drop rapidly above 2.8 kHz. The loss on D66 loaded loops shall be fairly constant to about 3.4 kHz and there shall be good response at 4.0 kHz. When voice frequency repeaters are in the circuit there will be some frequency weighting in the build-out network and the loss at the higher frequencies will be greater than for nonrepeatered loops.
(H) For nonloaded subscriber loops, the 1 kHz loss shall be approximately 0.9 dB per 100 ohms of measured dc loop resistance. Testing shall also be conducted to verify that the loss is approximately a straight line function with no abrupt changes. The 3 kHz loss should be approximately 70% higher than the 1 kHz loss.
(ii) Noise. The principal objective related to circuit noise (noise-metallic) and the acceptance of new plant is that circuit noise levels be 20 dBrnc or less (decibels above reference noise, C-message weighted (a weighting derived from listening tests, to indicate the relative annoyance or speech impairment by an interfering signal of frequency (f) as heard through a “500-type” telephone set)). For most new, properly installed, plant construction, circuit noise will usually be considerably less than 20 dBrnc unless there are unusually long sections of telephone plant in parallel with electric power facilities and/or power influence of paralleling electric facilities is abnormally high. When circuit noise is 20 dBrnc or less, the loop plant shall be considered acceptable. When measured circuit noise is greater than 20 dBrnc, loop plant shall still be considered acceptable providing circuit balance (power influence reading minus circuit noise readings) is 60 dB or greater and power influence readings are 85 dBrnc or greater. When circuit noise is greater than 20 dBrnc and circuit balance is less than 60 dB and/or power influence is less than 85 dBrnc, loop plant shall not be considered acceptable and the loop plant shall be remedied to make circuit balance equal to or greater than 60 dB.
(7) Data record. Measurement data shall be recorded. A suggested format similar to Format I for subscriber loops in § 1755.407 or a format specified in the applicable construction contract may be used.
(8) Probable causes for nonconformance - (i) Insertion loss. Some of the more common causes for failing to obtain the desired results may be due to reversed load coil windings, missing load coils, bridge taps between load coils, load coil spacing irregularities, excessive end sections, cables having high or low mutual capacitance, load coils having the wrong inductance, load coils inadvertently installed in nonloaded loops, moisture or water in cable, split pairs, and improperly spliced connections. The above factors can occur singularly or in combination. Experience to date indicates that the most common problems are missing load coils, reversed load coil windings or bridge taps.
(ii) Noise. Some of the common causes for failing to obtain the desired results may be due to high power influence from paralleling electrical power systems, poor telephone circuit balance, discontinuous cable shields, inadequate bonding and grounding of cable shields, high capacitance unbalance-to-ground of the cable pairs, high dc loop resistance unbalance, dc loop current less than 20 milliamperes, etc. The above factors can occur singularly or in combination. See TE&CM Section 451, Telephone Noise Measurement and Mitigation, for steps to be taken in reducing telecommunications line noise.
(f) One-person open circuit measurement (subscriber loops). (1) When specified by the borrower, open circuit measurements shall be made on all loaded and nonloaded subscriber loops upon completion of the cable work to verify that the plant is free from major impedance irregularities.
(2) For loaded loops, open circuit measurements shall be made using one of the following methods:
(i) Impedance or pulse return pattern, with cable pair trace compared to that of an artificial line of the same length and gauge. For best results, a level tracer or fault locator with dual trace capability is required;
(ii) Return loss using a level tracer, with cable pair compared to an artificial line of the same length and gauge connected in lieu of a Precision Balance Network (PBN). This method can be made with level tracers having only single trace capability; or
(iii) Open circuit structural return loss using a level tracer. This method can be made with level tracer having only single trace capability.
(3) Of the three methods suggested for loaded loops, the method specified in paragraph (f)(2)(ii) of this section is the preferred method because it can yield both qualitative and quantitative results. The methods specified in paragraphs (f)(2)(i) and (f)(2)(iii) of this section can be used as trouble shooting tools should irregularities be found during testing.
(4) For nonloaded loops, open circuit measurements shall be made using the method specified in paragraph (f)(2)(i) of this section.
(5) Method of measurement. Open circuit measurements shall be made at the CO on each loaded and nonloaded pair across the tip and ring terminals of the pair under test. All CO equipment shall be disconnected at the MDF for this test. For loaded loops containing voice frequency repeaters installed in the CO or field mounted, the open circuit measurement shall be made after the repeaters have been disconnected. Where field mounted repeaters are used, the open circuit measurement shall be made at the repeater location in both directions.
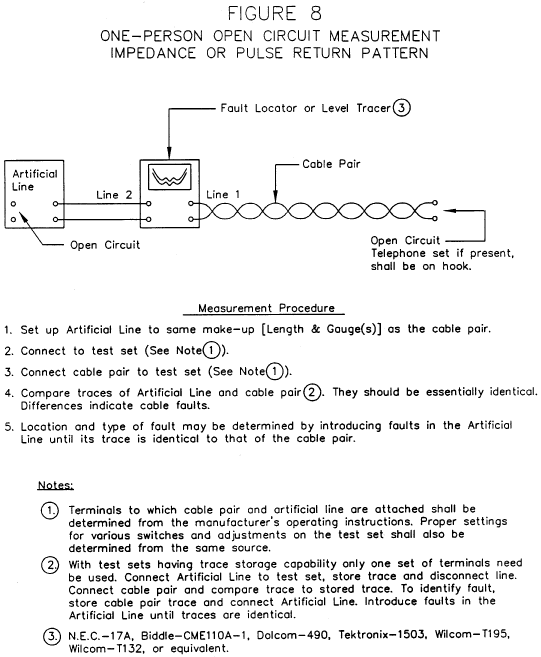
(i) Impedance or pulse return pattern. The step-by-step measurement procedure using the impedance or pulse return pattern for loaded and nonloaded loops shall be as shown in Figure 8. An artificial line of the same makeup as the cable to be tested shall be set up. The traces of the impedance or pulse return pattern from the cable pair and the artificial line shall be compared and should be essentially identical. If the impedance or pulse return traces from the cable pair are different than the artificial line trace, cable faults are possible. When the cable pair trace indicates possible defects, the defects should be identified and located. One method of identifying and locating defects involves introducing faults into the artificial line until its trace is identical with the cable trace.
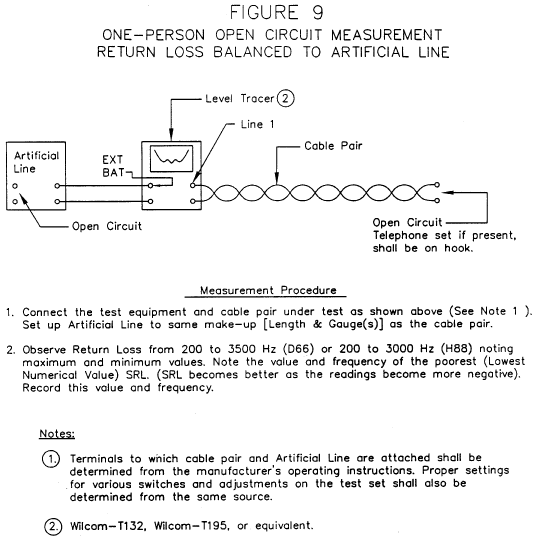
(ii) Return loss balanced to artificial line. The step-by-step measurement procedure using the return loss balanced to artificial line for loaded loops shall be as shown in Figure 9. An artificial line of the same makeup as the cable to be tested shall be set up. The artificial line is connected to the external network terminals of the test set. The cable pair under test is compared to this standard. When defects are found, they should be identified and located by introducing faults into the artificial line. This is more difficult than with the method referenced in paragraph (f)(5)(i) of this section since this measurement is more sensitive to minor faults and only a single trace is used.
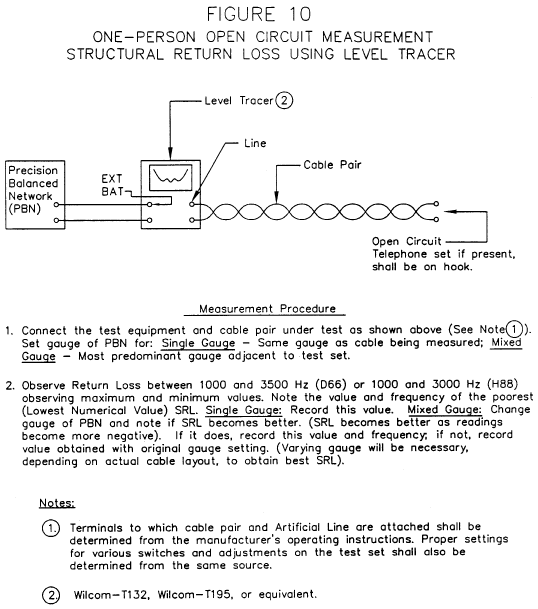
(iii) Open circuit structural return loss using level tracer. The step-by-step measurement procedure using the level tracer for loaded loops shall be as shown in Figure 10. The cable pair is compared to a PBN.
(6) Test equipment. Equipment for performing these tests is shown in Figures 8 through 10. For loaded loops, artificial loaded lines must be of the same gauge and loading scheme as the line under test. For nonloaded loops, artificial nonloaded lines must be of the same gauge as the line under test. Artificial lines should be arranged using switches or other quick connect arrangements to speed testing and troubleshooting. Figures 8 through 10 are as follows:
(7) Applicable results. (i) For loaded and nonloaded loops, the two traces in the pulse return pattern or impedance method (paragraph (f)(5)(i) of this section) shall be essentially identical. The degree of comparison required of the two traces is to be determined by experience.
(ii) For loaded loops, results for return loss measurements using a level tracer, with artificial line, in lieu of a PBN (paragraph (f)(5)(ii) of this section) shall meet the following requirements:
(A) For D66 and H88 loaded cables the structural return loss (SRL) values shall range between 28 and 39 dB, respectively, at the critical frequency of structural return loss (CFSRL) within the pass band of the loading system being used. The minimum SRL value for uniform gauge shall be 25 dB CFSRL. These SRL values apply for loaded cables of uniform gauge for the entire length of the subscriber loop circuit. Subscriber loop circuits shall meet the loading spacing deviations and the cable mutual capacitance requirements in the applicable RUS cable specifications;
(B) For mixed gauge loaded cables the SRL values shall be 25 and 27 dB CFSRL, respectively, and the minimum SRL value shall be 22 dB CFSRL; and
(C) The two traces in the pulse return pattern should be essentially identical. The degree of comparison required of the two traces is determined by experience.
(iii) For loaded loops, the results of open circuit structural return loss measurements using a level tracer (paragraph (f)(5)(iii) of this section) shall meet the following requirements. For D66 and H88 loaded cables with uniform or mixed gauges, the worst value allowed for measured open circuit structural return loss between 1,000-3,500 Hz and 1,000-3,000 Hz, respectively, shall be approximately 0.9 dB (round trip) for each 100 ohms outside plant dc loop resistance including the resistance of the load coils. The value of 0.9 dB per 100 ohms for the round trip loss remains reasonably accurate as long as:
(A) The subscriber end section of the loaded pair under test is approximately 2,250 ft (685 m) for D66 loading or 3,000 ft (914 m) for H88 loading in length; and
(B) The one-way 1,000 Hz loss does not exceed 10 dB.
(iv) For loaded loops, the measured value of open circuit structural return loss can only be as accurate as the degree to which the dc loop resistance of the loaded pair under test is known. Most accurate results shall be obtained when the dc loop resistance is known by actual measurements as described in paragraph (d) of this section. Furthermore, where the dc loop resistance is measured at the same time as the open circuit structural return loss, no correction for temperature is needed because the loss is directly proportional to the loop resistance. Where it is not practical to measure the dc loop resistance, it shall be calculated and corrected for temperature as specified in paragraph (d)(6)(ii) of this section. When measuring existing plant, care shall be taken to verify the accuracy of the records, if they are used for the calculation of the dc loop resistance. For buried plant, the temperature correction shall be based at the normal depth of the cable in the ground. (Temperature can be measured by boring a hole to cable depth with a ground rod, placing a thermometer in the ground at the cable depth, and taking and averaging several readings during the course of the resistance measurements.) For aerial cable it shall be based on the temperature inside the cable sheath.
(v) For loaded loops, the best correlation between the measured and the expected results shall be obtained when the cable is of one gauge, one size, and the far end section is approximately 2,250 ft (685 m) for D66 loading or 3,000 ft (914 m) for H88 loading. Mixing gauges and cable sizes will result in undesirable small reflections whose frequency characteristics and magnitude cannot be accurately predicted. In subscriber loop applications, cable gauge may be somewhat uniform but the cable pair size most likely will not be uniform as cable pair sizes taper off toward the customer access location and a downward adjustment of 1 dB of the allowed value shall be acceptable. “Long” end sections (as defined in TE&CM Section 424, “Guideline for Telecommunications Subscriber Loop Plant”) lower the expected value, a further downward adjustment of 3 dB in the allowed value shall be acceptable.
(vi) For loaded loops, the limiting factor when making open circuit structural return loss measurements is when the 1,000 Hz one-way loss of the loaded cable pair under test becomes 10 dB or greater; it becomes difficult to detect the presence of irregularities beyond the 10 dB point on the loop. To overcome this difficulty, loaded loops having a one-way loss at 1,000 Hz greater than 10 dB shall be opened at some convenient point (such as a pedestal or ready access enclosure) and loss measurements at the individual portions measuring less than 10 dB one-way shall be made separately. When field mounted voice frequency repeaters are used, the measurement shall be made at the repeater location in both directions.
(8) Data record. (i) When performing a pulse return pattern or impedance open circuit measurement on loaded and nonloaded loops, a “check mark” indicating that the pair tests good or an “X” indicating that the pair does not test good shall be recorded in the SRL column. A suggested format similar to Format I for subscriber loops in § 1755.407 or a format specified in the applicable construction contract may be used.
(ii) When performing open circuit return loss measurements using the return loss balanced to an artificial line or return loss using a level tracer on loaded loops, the value of the poorest (lowest numerical value) SRL and its frequency in the proper column between 1,000 and 3,500 Hz for D66 loading or between 1,000 and 3,000 Hz for H88 loading shall be recorded. A suggested format similar to Format I for subscriber loops in § 1755.407 or a format specified in the applicable construction contract may be used.
(9) Probable causes for nonconformance. Some of the more common causes for failing to obtain the desired results may be due to reversed load coil windings, missing load coils, bridge taps between load coils, load coil spacing irregularities, excessive end sections, cables having high or low mutual capacitance, load coils inadvertently installed in nonloaded loops, moisture or water in the cable, load coils having the wrong inductance, split pairs, and improperly spliced connectors. The above can occur singularly or in combination. Experience to date indicates that the most common problems are missing load coils, reversed load coil windings or bridge taps.
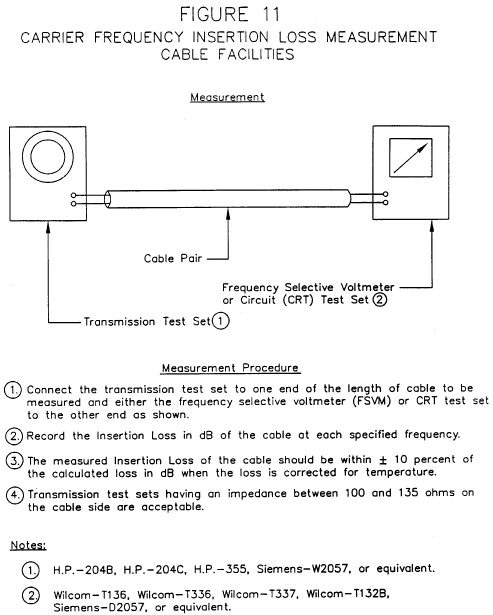
(g) Cable insertion loss measurement (carrier frequencies). (1) When specified by the borrower, carrier frequency insertion loss measurements shall be made on cable pairs used for T1, T1C, and/or station carrier systems. Carrier frequency insertion loss shall be made on a minimum of three pairs. Select at least one pair near the outside of the core unit layup. If the three measured pairs are within 10% of the calculated loss in dB corrected for temperature, no further testing is necessary. If any of the measured pairs of a section are not within 10% of the calculated loss in dB, all pairs in that section used for carrier transmission shall be measured.
(2) Method of measurement. The step-by-step method of measurement shall be as shown in Figure 11.
(3) Test equipment. The test equipment is shown in Figure 11 as follows:
(4) Applicable results. (i) The highest frequency to be measured is determined by the type of carrier system. For T1 type carrier, the highest frequency is normally 772 kHz. For T1C type carrier, the highest frequency is normally 1576 kHz. The highest frequency to be measured for station carrier is 140 kHz.
(ii) The measured insertion loss of the cable shall be within ±10% of the calculated loss in dB when the loss is corrected for temperature.
(iii) The calculated insertion loss is computed as follows:
(A) Multiply the length of each different gauge by the applicable dB per unit length as shown in Table 7 or 8 as follows:
Table 7 - Cable Attenuation @ 68 °F (20 °C) Filled Cables - Solid Insulation
| Frequency (kHz) | Attenuation dB/mile (dB/km) Gauge (AWG) | |||
|---|---|---|---|---|
| 19 | 22 | 24 | 26 | |
| 10 | 2.8 (1.7) | 4.8 (2.9) | 6.4 (3.9) | 8.5 (5.3) |
| 20 | 3.2 (2.0) | 5.8 (3.6) | 8.2 (5.1) | 11.2 (6.9) |
| 40 | 3.6 (2.2) | 6.5 (4.0) | 9.6 (6.0) | 13.9 (8.6) |
| 60 | 4.0 (2.5) | 6.9 (4.2) | 10.3 (6.4) | 15.2 (9.4) |
| 80 | 4.5 (2.8) | 7.3 (4.5) | 10.7 (6.6) | 16.0 (9.9) |
| 100 | 4.9 (3.0) | 7.7 (4.7) | 11.1 (6.8) | 16.5 (10.2) |
| 112 | 5.2 (3.2) | 8.0 (4.9) | 11.3 (7.0) | 16.8 (10.5) |
| 120 | 5.4 (3.3) | 8.1 (5.0) | 11.5 (7.1) | 17.0 (10.6) |
| 140 | 5.8 (3.6) | 8.6 (5.3) | 11.9 (7.4) | 17.4 (10.8) |
| 160 | 6.2 (3.8) | 9.0 (5.6) | 12.3 (7.6) | 17.8 (11.1) |
| 180 | 6.6 (4.1) | 9.5 (5.9) | 12.7 (7.9) | 18.2 (11.3) |
| 200 | 7.0 (4.3) | 10.0 (6.2) | 13.2 (8.2) | 18.6 (11.5) |
| 300 | 8.7 (5.4) | 12.2 (7.5) | 15.4 (9.6) | 20.6 (12.8) |
| 400 | 10.0 (6.2) | 14.1 (8.8) | 17.7 (11.0) | 22.9 (14.2) |
| 500 | 11.2 (6.9) | 15.9 (9.8) | 19.8 (12.3) | 25.2 (15.6) |
| 600 | 12.2 (7.5) | 17.5 (10.9) | 21.8 (13.6) | 27.4 (17.0) |
| 700 | 13.2 (8.2) | 19.0 (11.8) | 23.6 (14.7) | 29.6 (18.4) |
| 772 | 13.8 (8.5) | 19.9 (12.4) | 24.8 (15.4) | 31.4 (19.5) |
| 800 | 14.2 (8.8) | 20.1 (12.5) | 27.4 (17.1) | 31.7 (19.7) |
| 900 | 14.8 (9.2) | 21.6 (13.4) | 29.0 (18.0) | 33.8 (21.0) |
| 1000 | 15.8 (9.8) | 22.7 (14.1) | 31.1 (19.3) | 35.9 (22.3) |
| 1100 | 16.4 (10.2) | 23.8 (14.8) | 32.7 (20.3) | 38.0 (23.6) |
| 1200 | 17.4 (10.8) | 24.8 (15.4) | 34.3 (21.3) | 40.0 (24.9) |
| 1300 | 17.9 (11.1) | 25.9 (16.1) | 35.4 (22.0) | 41.7 (25.9) |
| 1400 | 19.0 (11.8) | 26.9 (16.7) | 37.0 (23.0) | 43.3 (26.9) |
| 1500 | 19.5 (12.1) | 28.0 (17.4) | 38.0 (23.6) | 44.3 (27.6) |
| 1576 | 20.1 (12.4) | 29.0 (18.0) | 39.0 (24.3) | 44.4 (28.2) |
Table 8 - Cable Attenuation @ 68 °F (20 °C) Filled Cables - Expanded Insulation
| Frequency (kHz) | Attenuation dB/mile (dB/km) Gauge (AWG) | |||
|---|---|---|---|---|
| 19 | 22 | 24 | 26 | |
| 10 | 3.0 (1.8) | 4.9 (3.0) | 6.5 (4.0) | 8.6 (5.3) |
| 20 | 3.5 (2.1) | 6.0 (4.1) | 8.5 (5.2) | 11.5 (7.1) |
| 40 | 4.0 (2.5) | 7.0 (4.3) | 10.2 (6.3) | 14.4 (8.9) |
| 60 | 4.5 (2.8) | 7.5 (4.6) | 11.1 (6.8) | 16.0 (9.9) |
| 80 | 5.2 (3.3) | 7.9 (4.9) | 11.3 (6.9) | 16.2 (10.1) |
| 100 | 5.8 (3.6) | 8.4 (5.2) | 11.6 (7.2) | 16.4 (10.2) |
| 112 | 6.0 (3.8) | 8.8 (5.4) | 11.9 (7.4) | 16.6 (10.3) |
| 120 | 6.2 (3.9) | 9.0 (5.6) | 12.1 (7.5) | 16.9 (10.5) |
| 140 | 6.6 (4.1) | 9.5 (5.9) | 12.7 (7.9) | 17.2 (10.7) |
| 160 | 6.9 (4.3) | 10.0 (6.2) | 13.2 (8.2) | 17.4 (10.8) |
| 180 | 7.4 (4.6) | 10.6 (6.6) | 13.7 (8.5) | 17.9 (11.1) |
| 200 | 7.9 (4.9) | 11.1 (6.9) | 14.2 (8.8) | 18.5 (11.5) |
| 300 | 9.5 (5.9) | 13.2 (8.2) | 16.8 (10.5) | 21.6 (13.4) |
| 400 | 11.1 (6.9) | 15.3 (9.5) | 19.5 (12.1) | 24.3 (15.1) |
| 500 | 12.1 (7.5) | 17.9 (11.1) | 22.2 (13.8) | 27.4 (17.1) |
| 600 | 13.7 (8.5) | 19.5 (12.1) | 24.3 (15.1) | 29.6 (18.4) |
| 700 | 14.8 (9.2) | 21.1 (13.1) | 26.4 (16.4) | 32.2 (20.0) |
| 772 | 15.3 (9.5) | 21.6 (13.4) | 27.4 (17.1) | 33.8 (21.90) |
| 800 | 15.8 (9.8) | 22.2 (13.8) | 28.0 (17.4) | 34.4 (21.3) |
| 900 | 17.0 (10.5) | 23.8 (14.8) | 29.6 (18.4) | 36.4 (22.6) |
| 1000 | 17.4 (10.8) | 24.8 (15.4) | 31.1 (19.3) | 38.5 (23.9) |
| 1100 | 17.9 (11.1) | 26.4 (16.4) | 33.3 (20.7) | 40.6 (25.3) |
| 1200 | 19.0 (11.8) | 27.4 (17.1 | 34.3 (21.3) | 42.2 (26.2) |
| 1300 | 19.5 (12.1) | 28.5 (17.7) | 35.9 (22.3) | 43.8 (27.2) |
| 1400 | 20.1 (12.5 | 29.6 (18.4) | 37.0 (23.0) | 45.9 (28.5) |
| 1500 | 20.6 (12.8) | 30.6 (19.0) | 38.5 (23.9) | 47.5 (29.5) |
| 1576 | 21.6 (13.4) | 31.1 (19.3) | 39.1 (24.3) | 48.6 (30.2) |
(B) Add the individual losses for each gauge to give the total calculated insertion loss at a temperature of 68 °F (20 °C);
(C) Correct the total calculated insertion loss at the temperature of 68 °F (20 °C) to the measurement temperature by the following formulae:
At = A68 × [1 + 0.0012 × (t − 68)] for English Units At = A20 × [1 + 0.0022 × (t − 20)] for Metric Units Where: At = Insertion loss at the measurement temperature in dB. A68 = Insertion loss at a temperature of 68 °F in dB. A20 = Insertion loss at a temperature of 20 °C in dB. t = Measurement temperature in °F or (°C); and(D) Compare the calculated insertion loss at the measurement temperature to the measured insertion loss to determine compliance with the requirement specified in paragraph (g)(4)(ii) of this section. (Note: Attenuation varies directly with temperature. For each ±10 °F (5.6 °C) change in temperature increase or decrease the attenuation by ±1%.)
(iv) If the measured value exceeds the ±10% allowable variation, the cause shall be determined and corrective action shall be taken to remedy the problem.
(5) Data record. Results of carrier frequency insertion loss measurements for station, T1, and/or T1C type carrier shall be recorded. Suggested formats similar to Format III, Outside Plant Acceptance Tests - T1 or T1C Carrier Pairs, and Format IV, Outside Plant Acceptance Tests - Station Carrier Pairs, in § 1755.407 or formats specified in the applicable construction contract may be used.
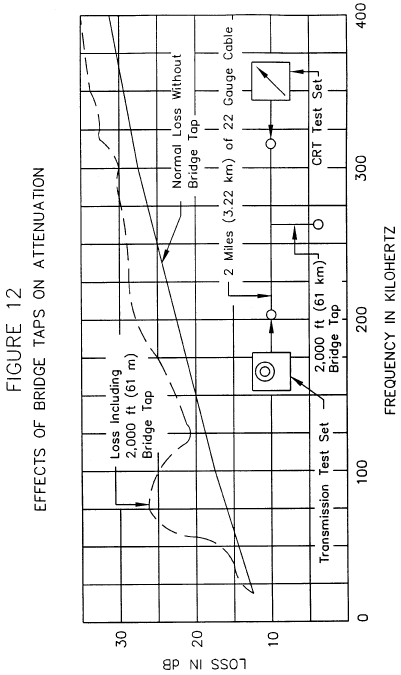
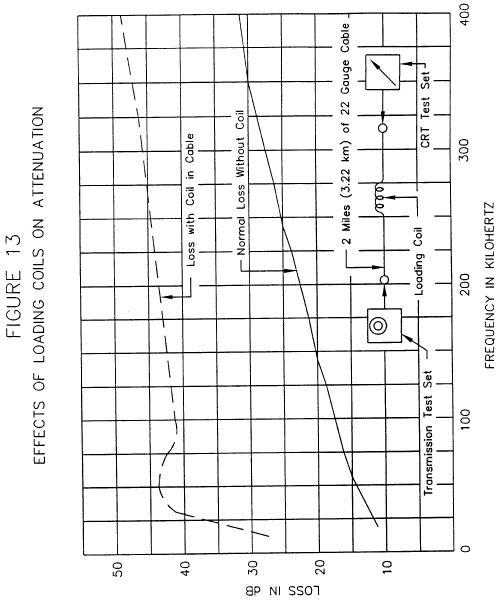
(6) Probable causes for nonconformance. If the measured loss is low, the cable records are likely to be in error. If the measured loss is high, there may be bridge taps, load coils or voice frequency build-out capacitors connected to the cable pairs or the cable records may be in error. Figures 12 and 13 are examples that show the effects of bridge taps and load coils in the carrier path. Figures 12 and 13 are as follows:
 [62 FR 23962, May
2, 1997]